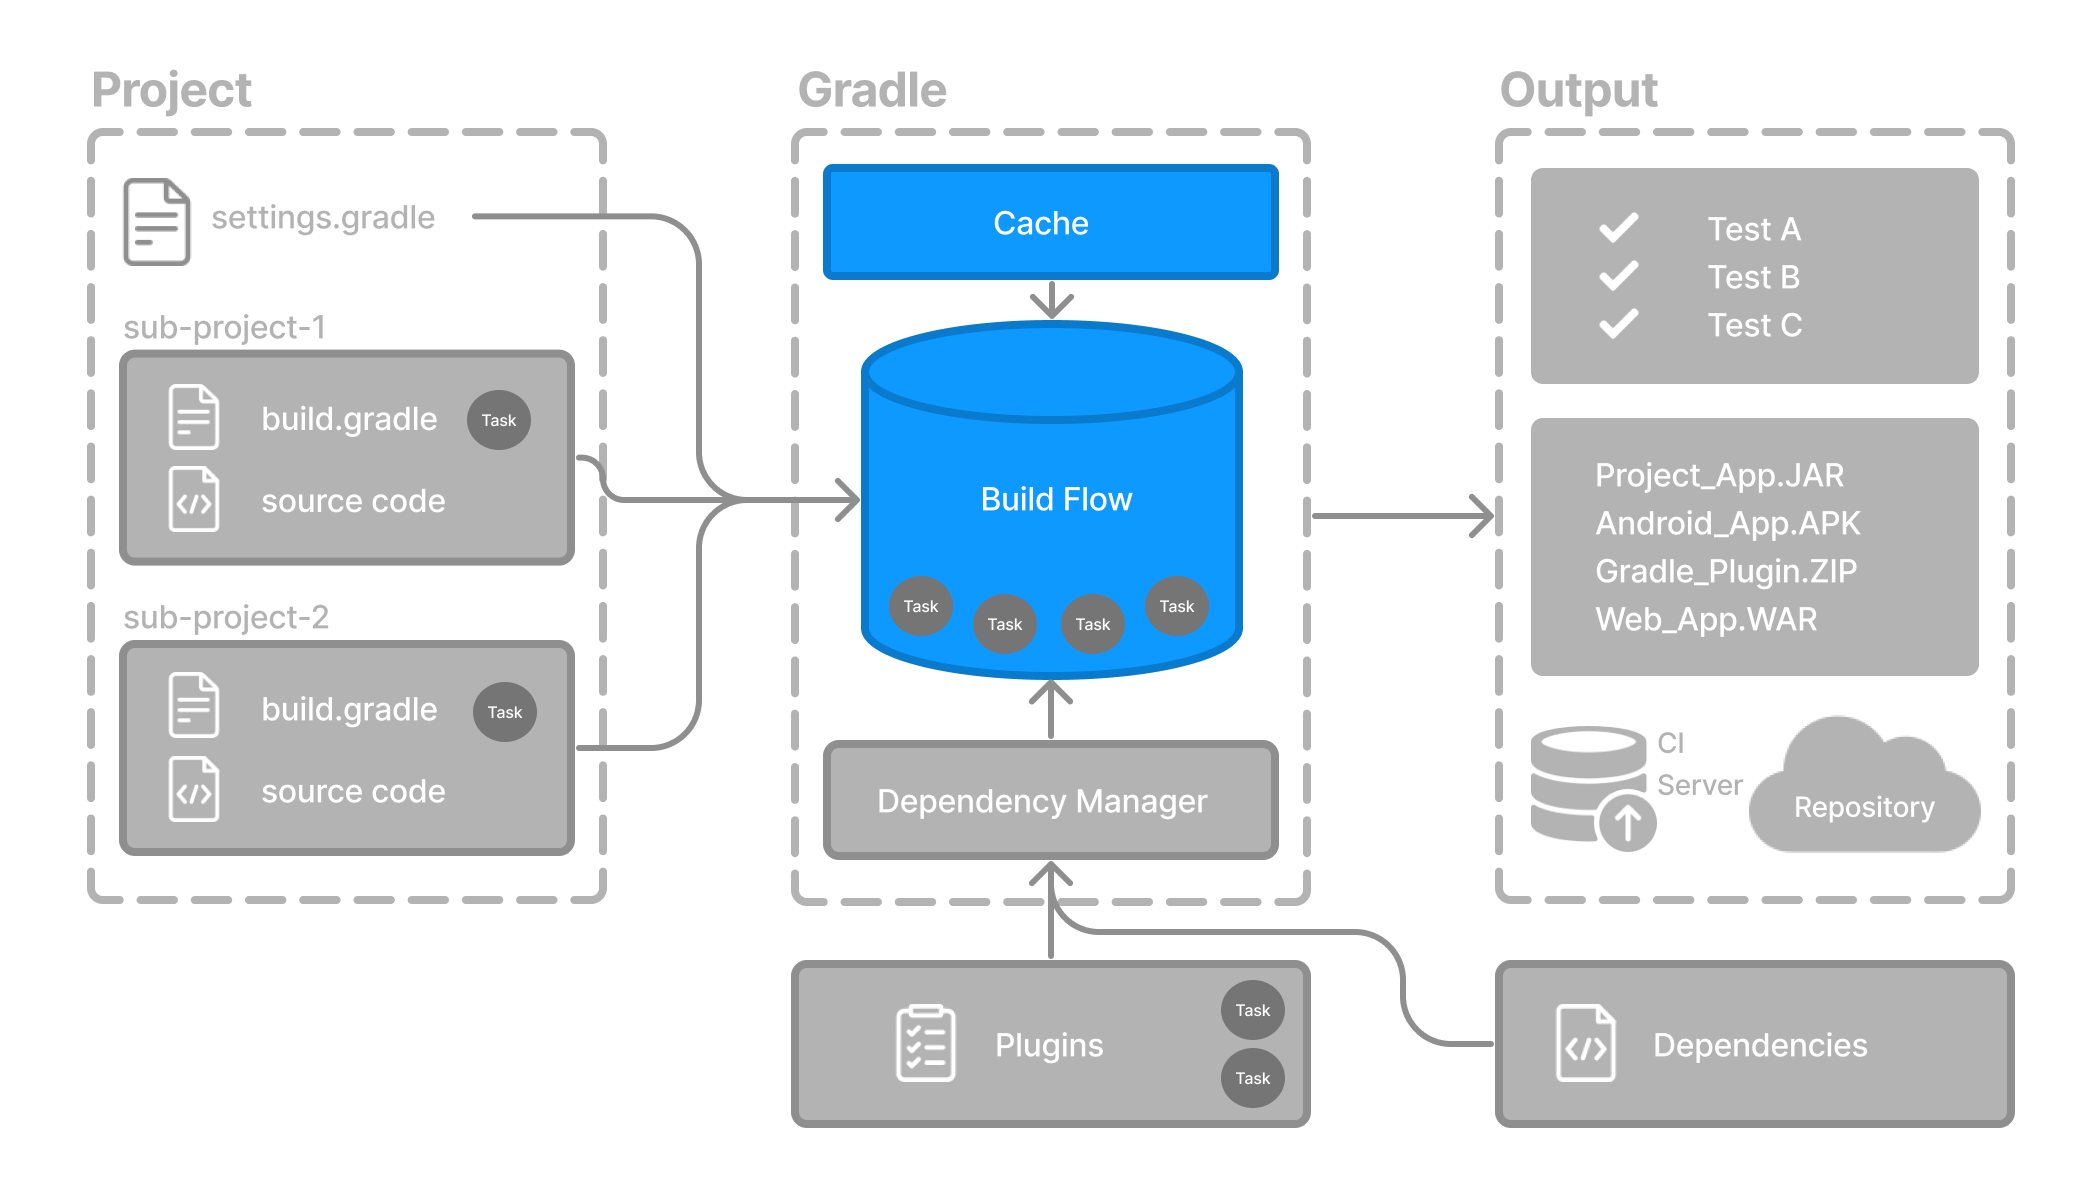
Gradle core concepts
Gradle automates building, testing, and deployment of software from information in build scripts.
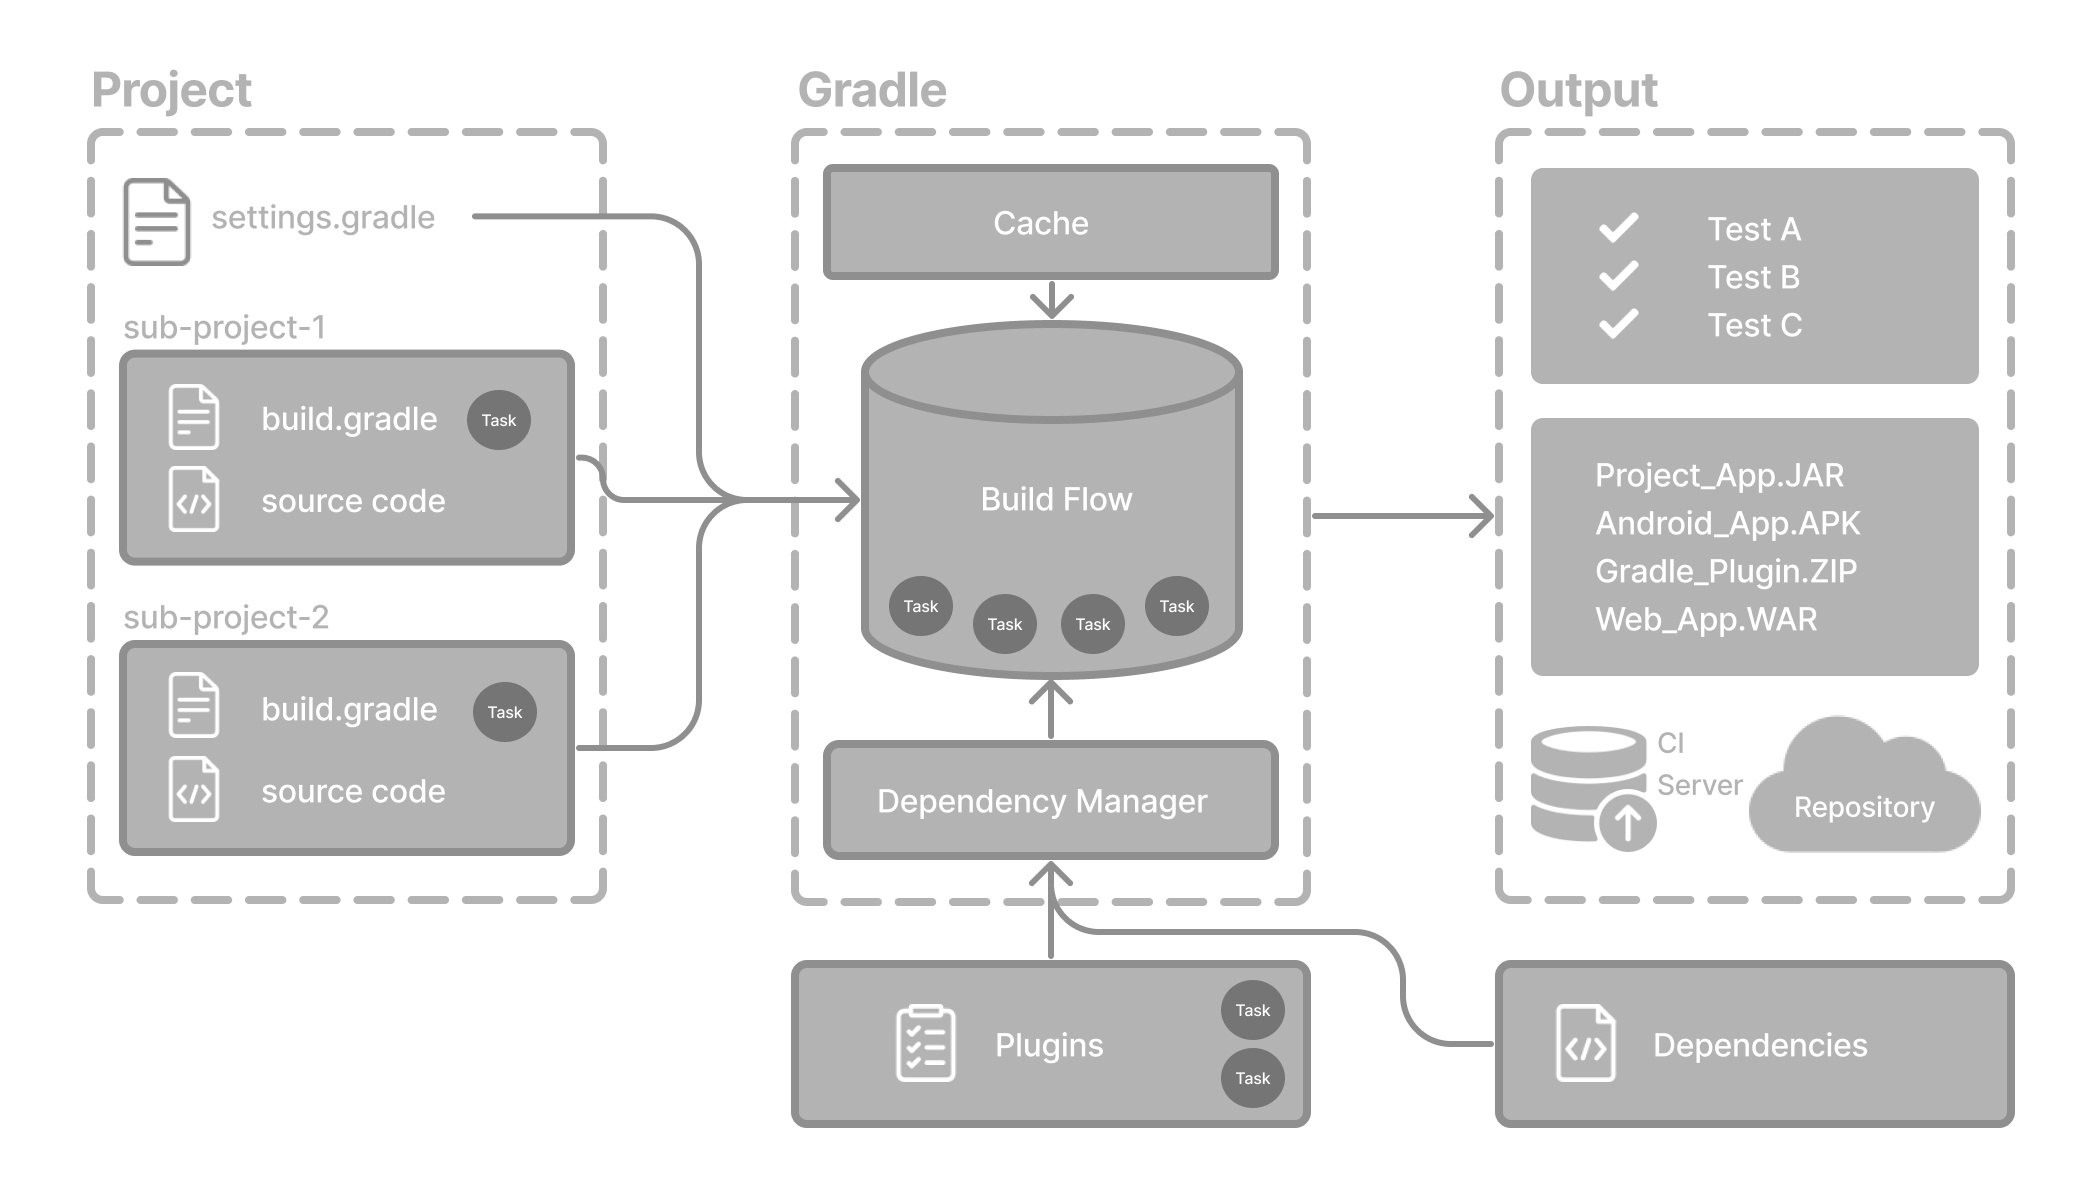
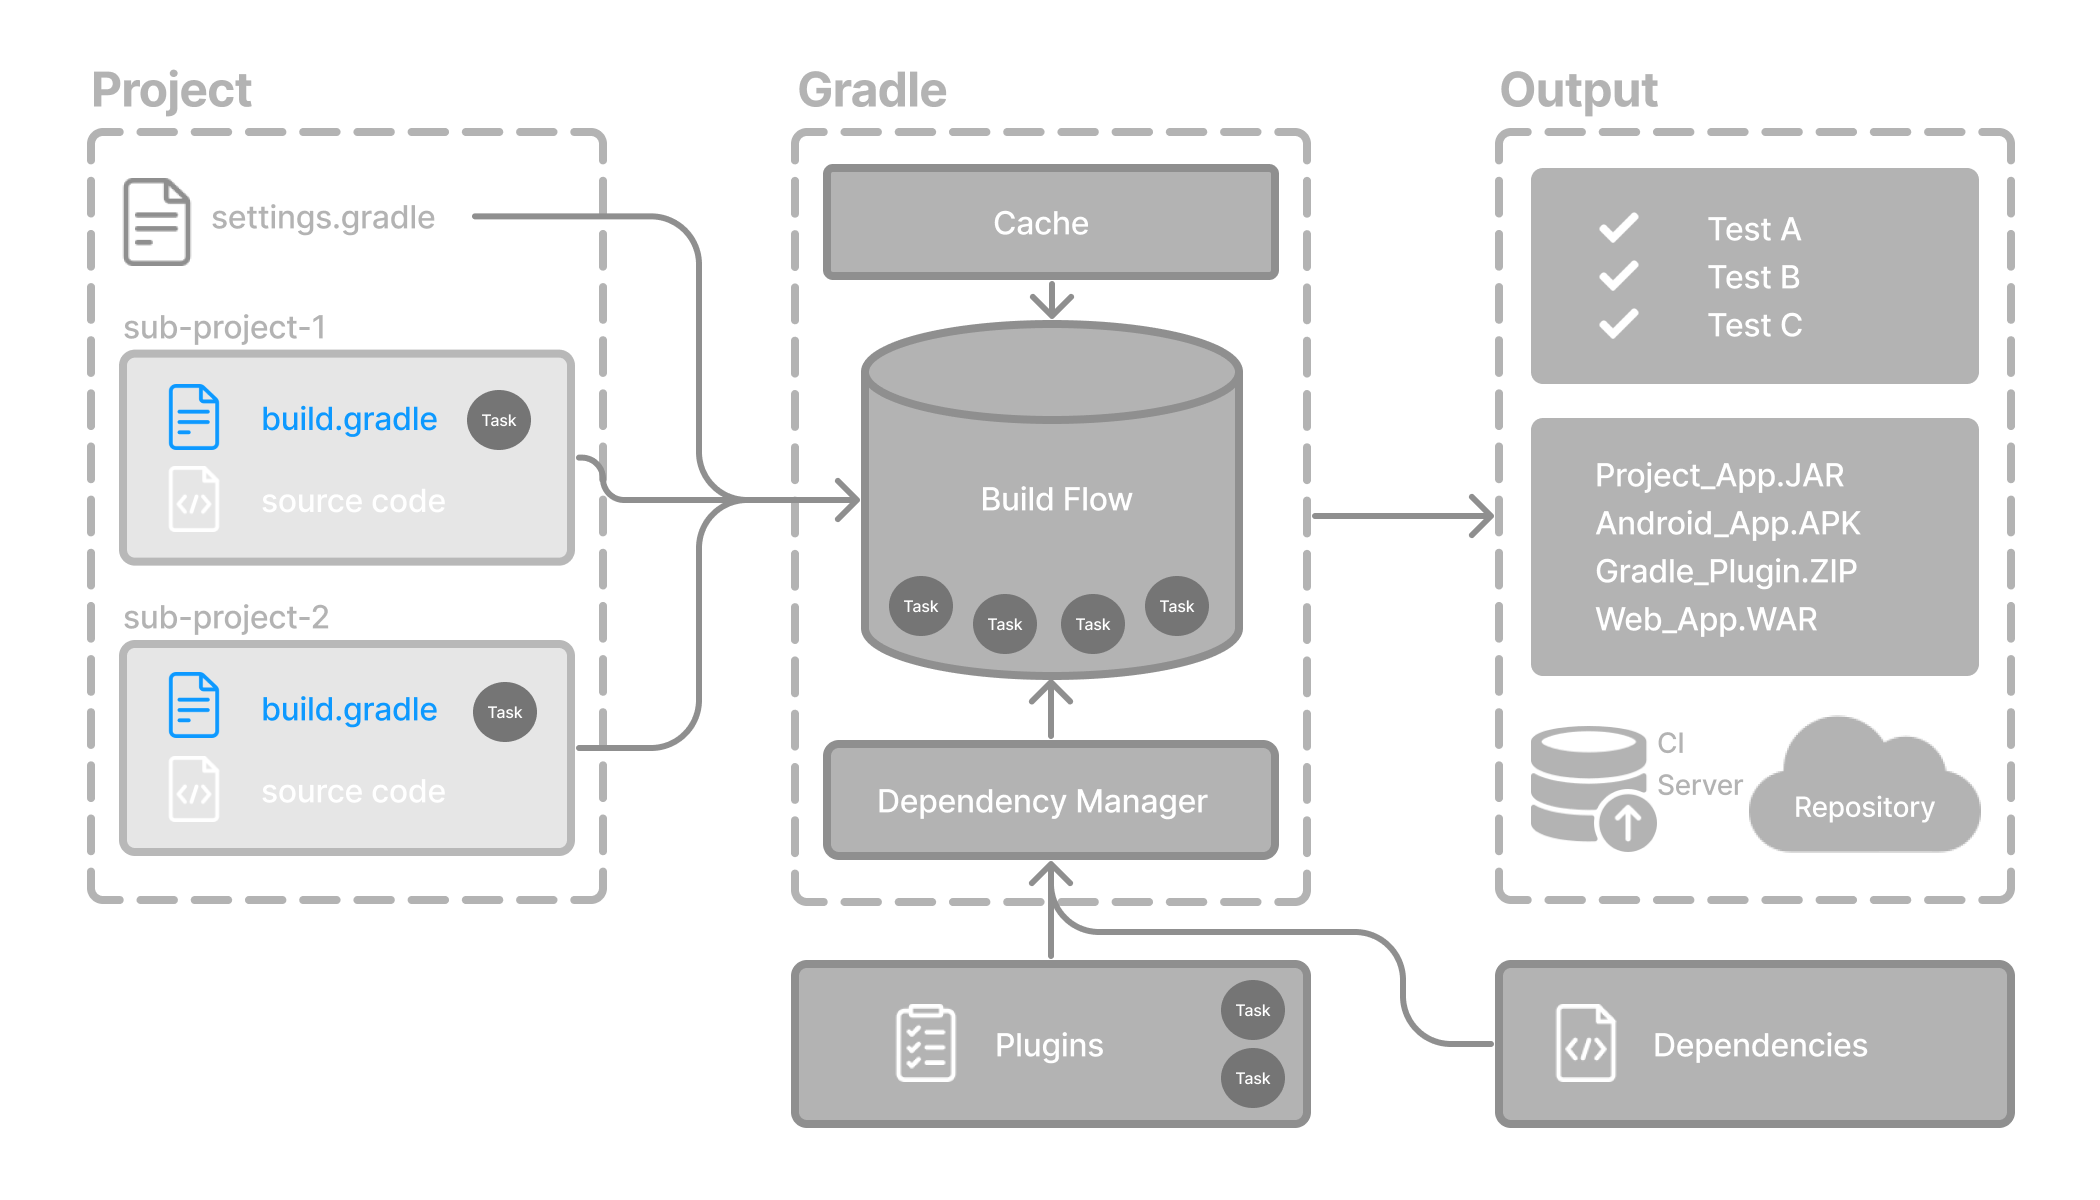
Gradle core concepts
Projects
A Gradle project is a piece of software that can be built, such as an application or a library.
Single project builds include a single project called the root project.
Multi-project builds include one root project and any number of subprojects.
Build Scripts
Build scripts detail to Gradle what steps to take to build the project.
Each project can include one or more build scripts.
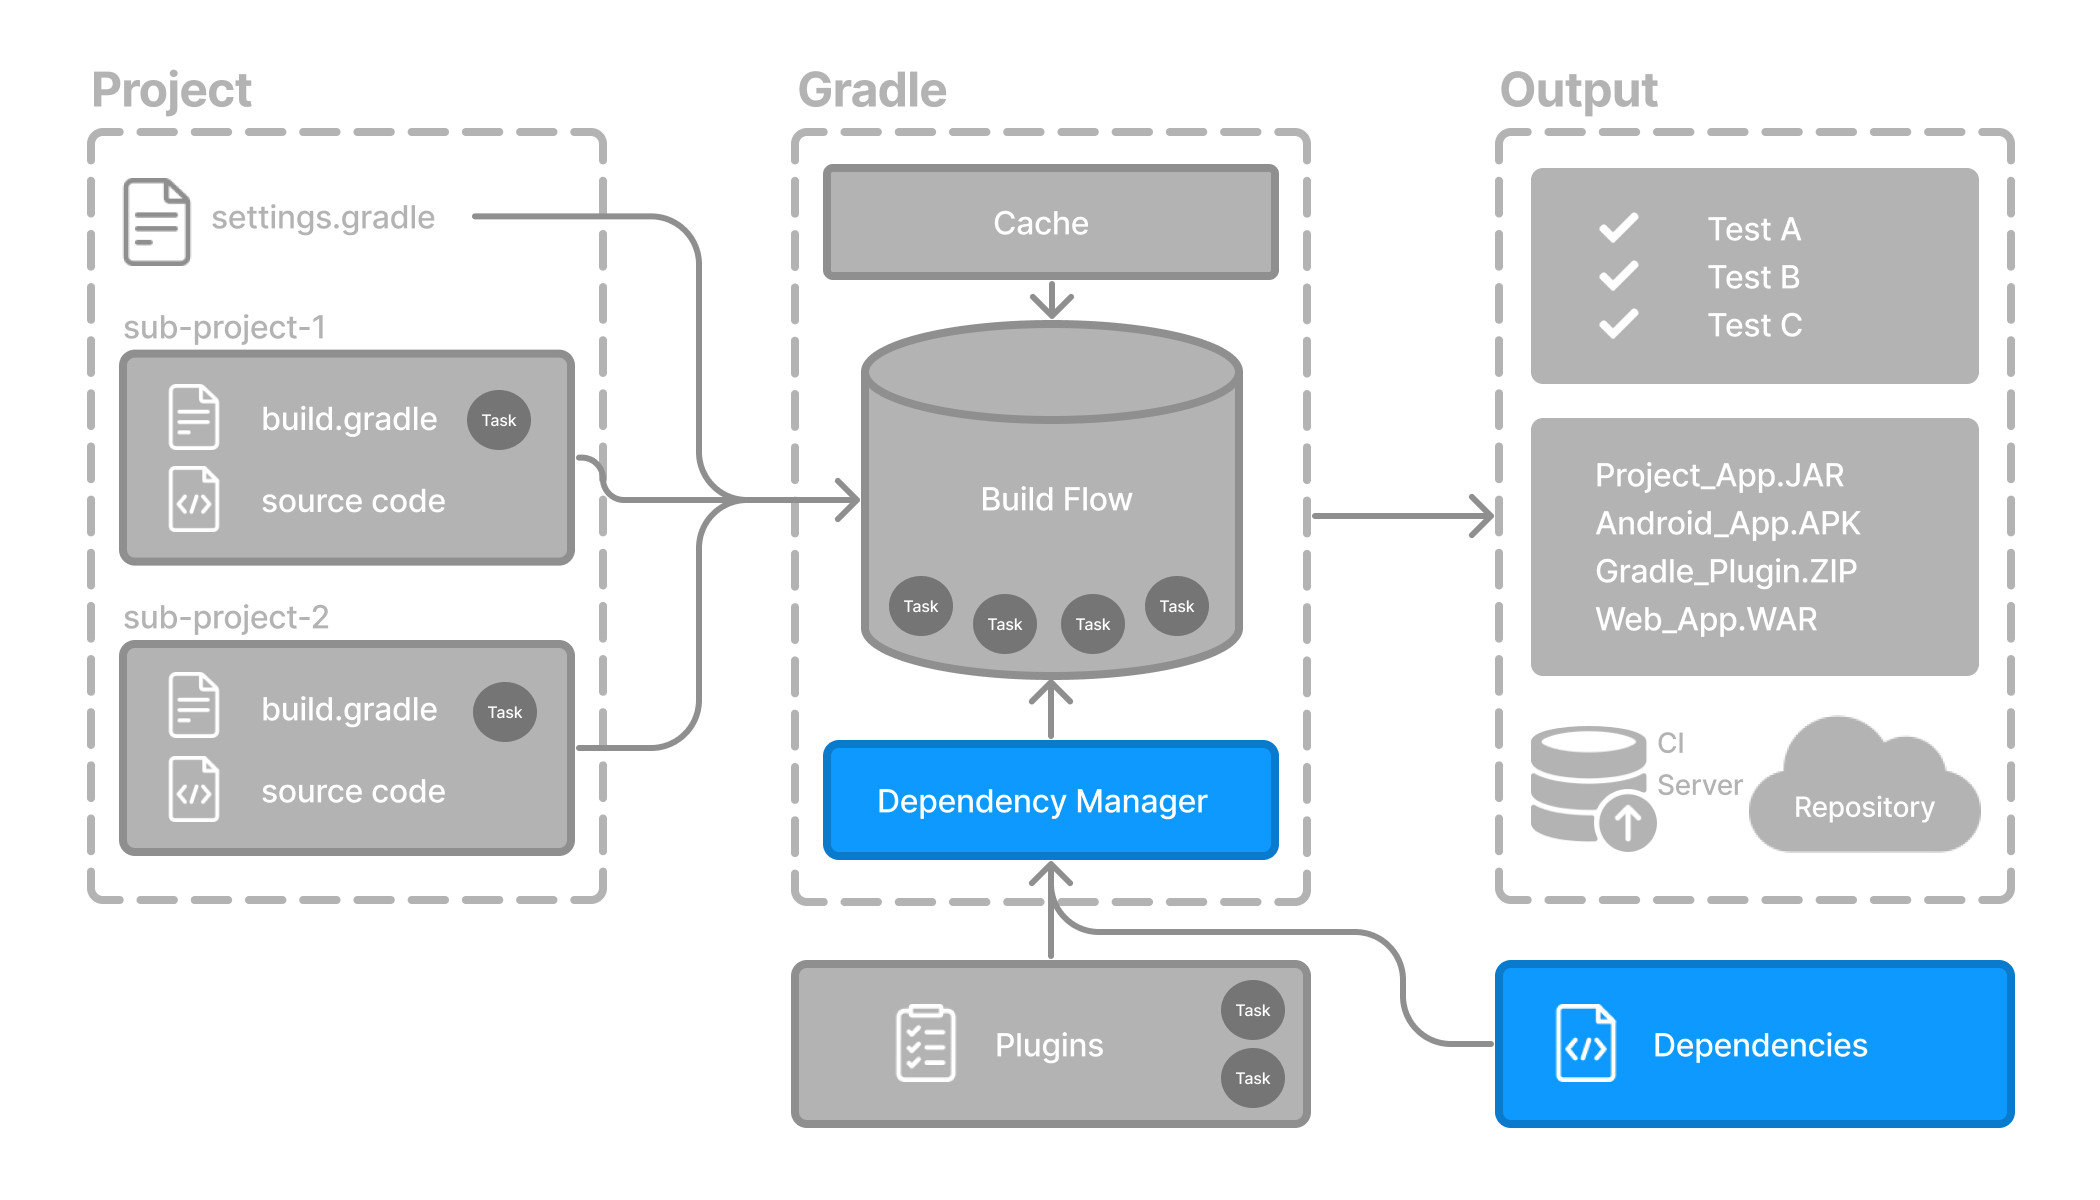
Dependency Management
Dependency management is an automated technique for declaring and resolving external resources required by a project.
Each project typically includes a number of external dependencies that Gradle will resolve during the build.
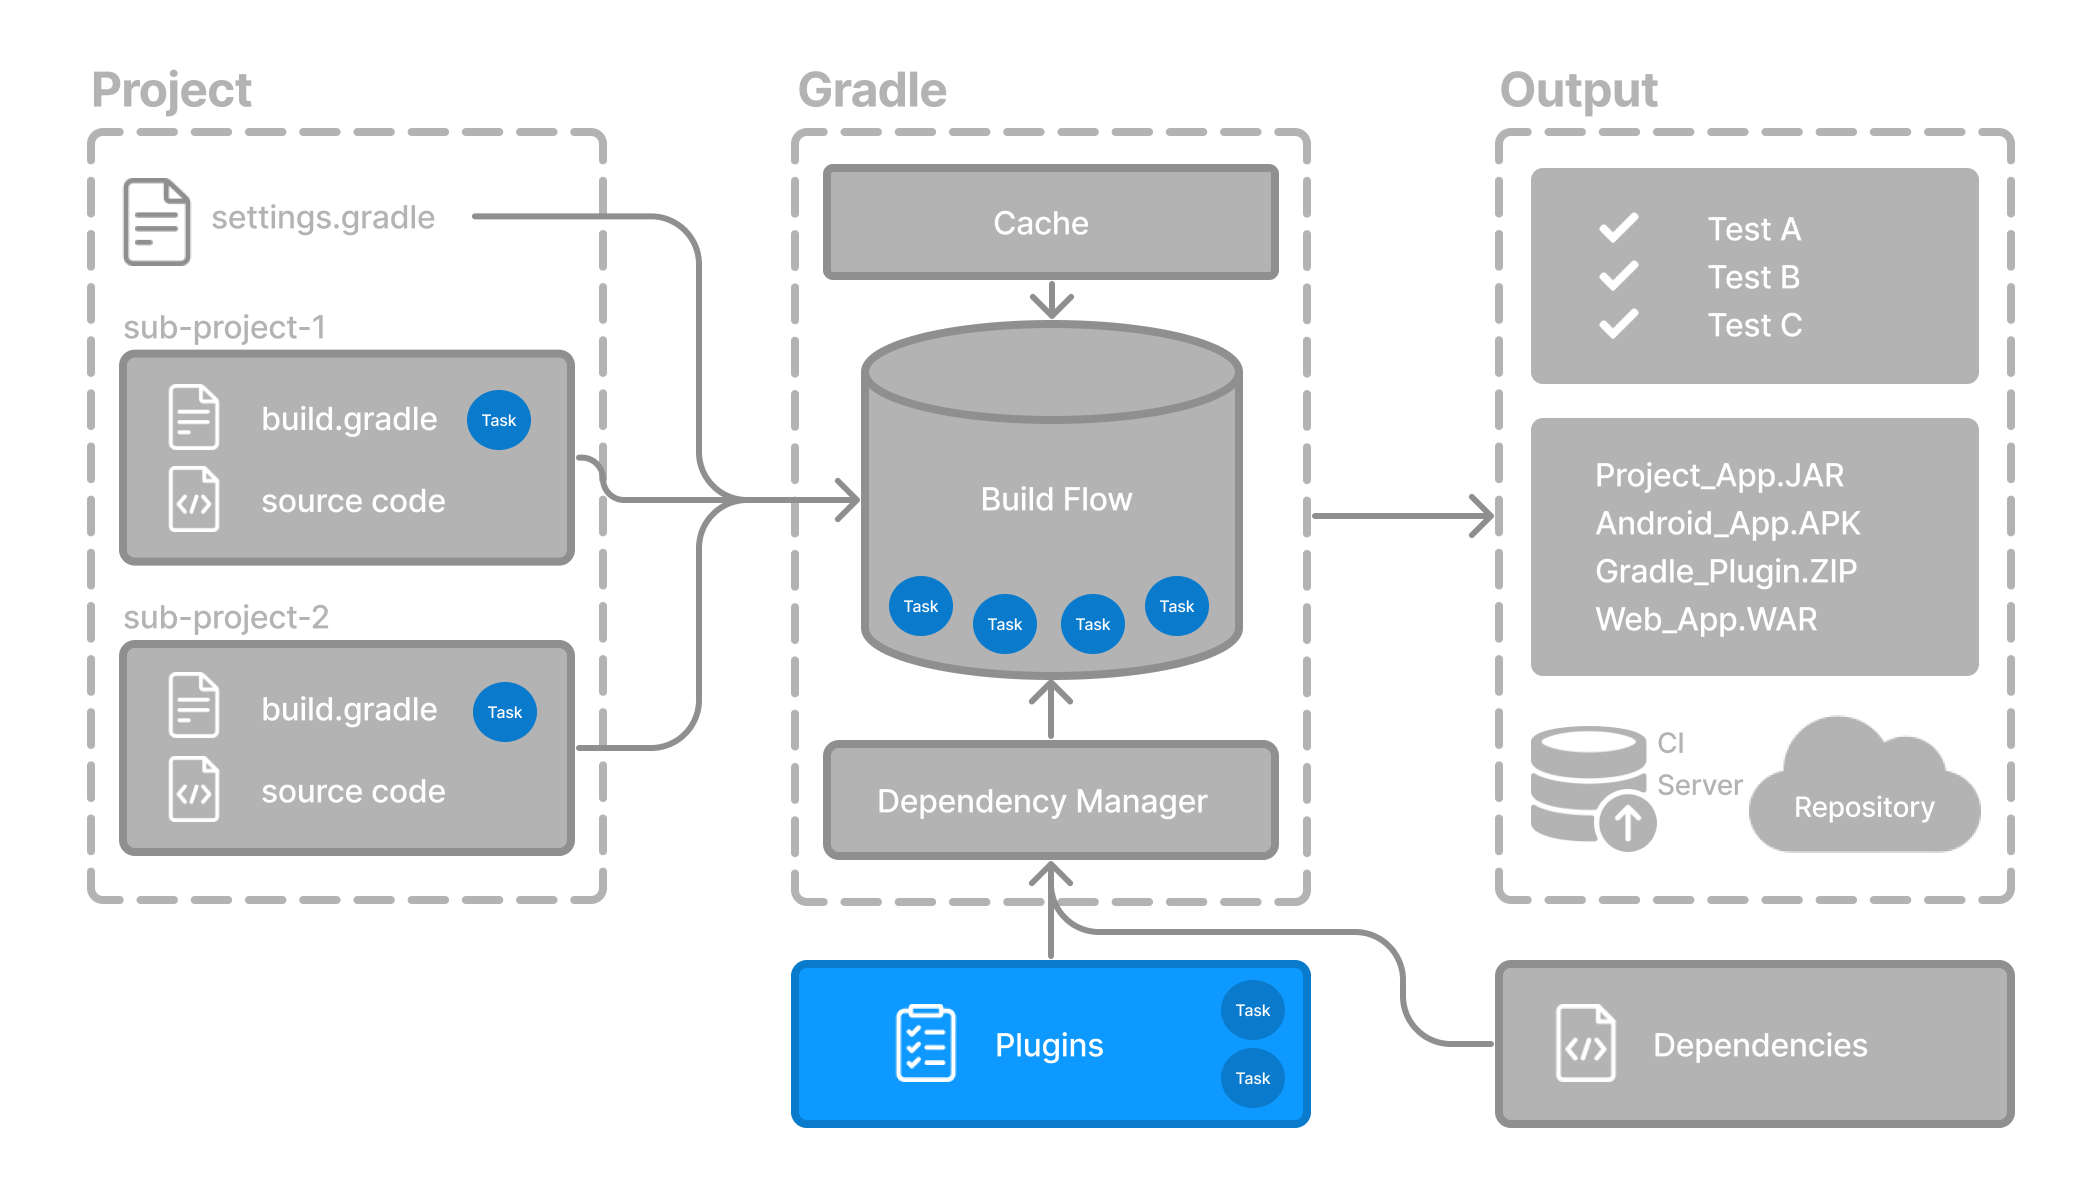
Tasks
Tasks are a basic unit of work such as compiling code or running your test.
Each project contains one or more tasks defined inside a build script or a plugin.
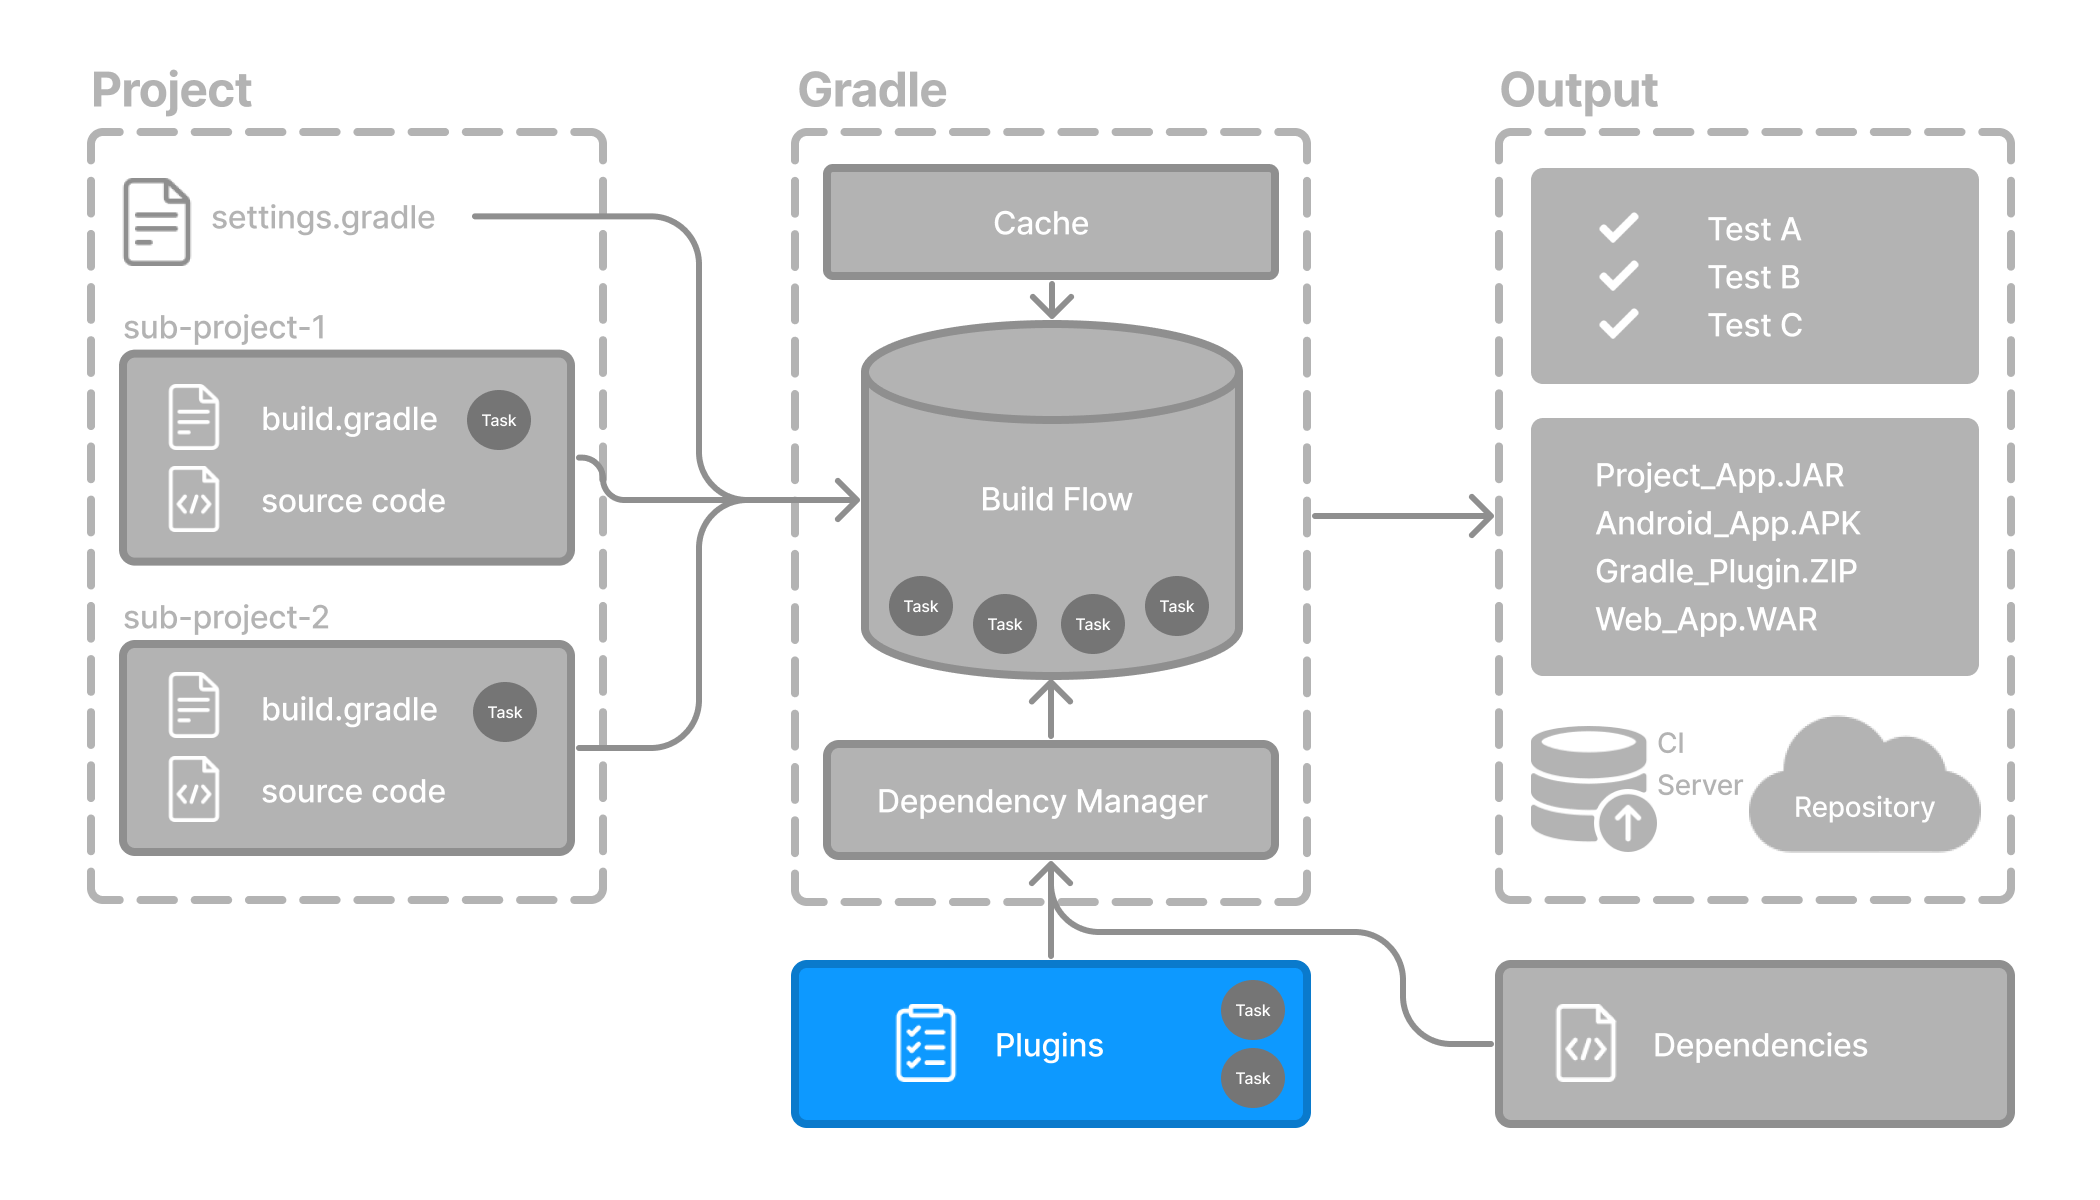
Plugins
Plugins are used to extend Gradle’s capability and optionally contribute tasks to a project.
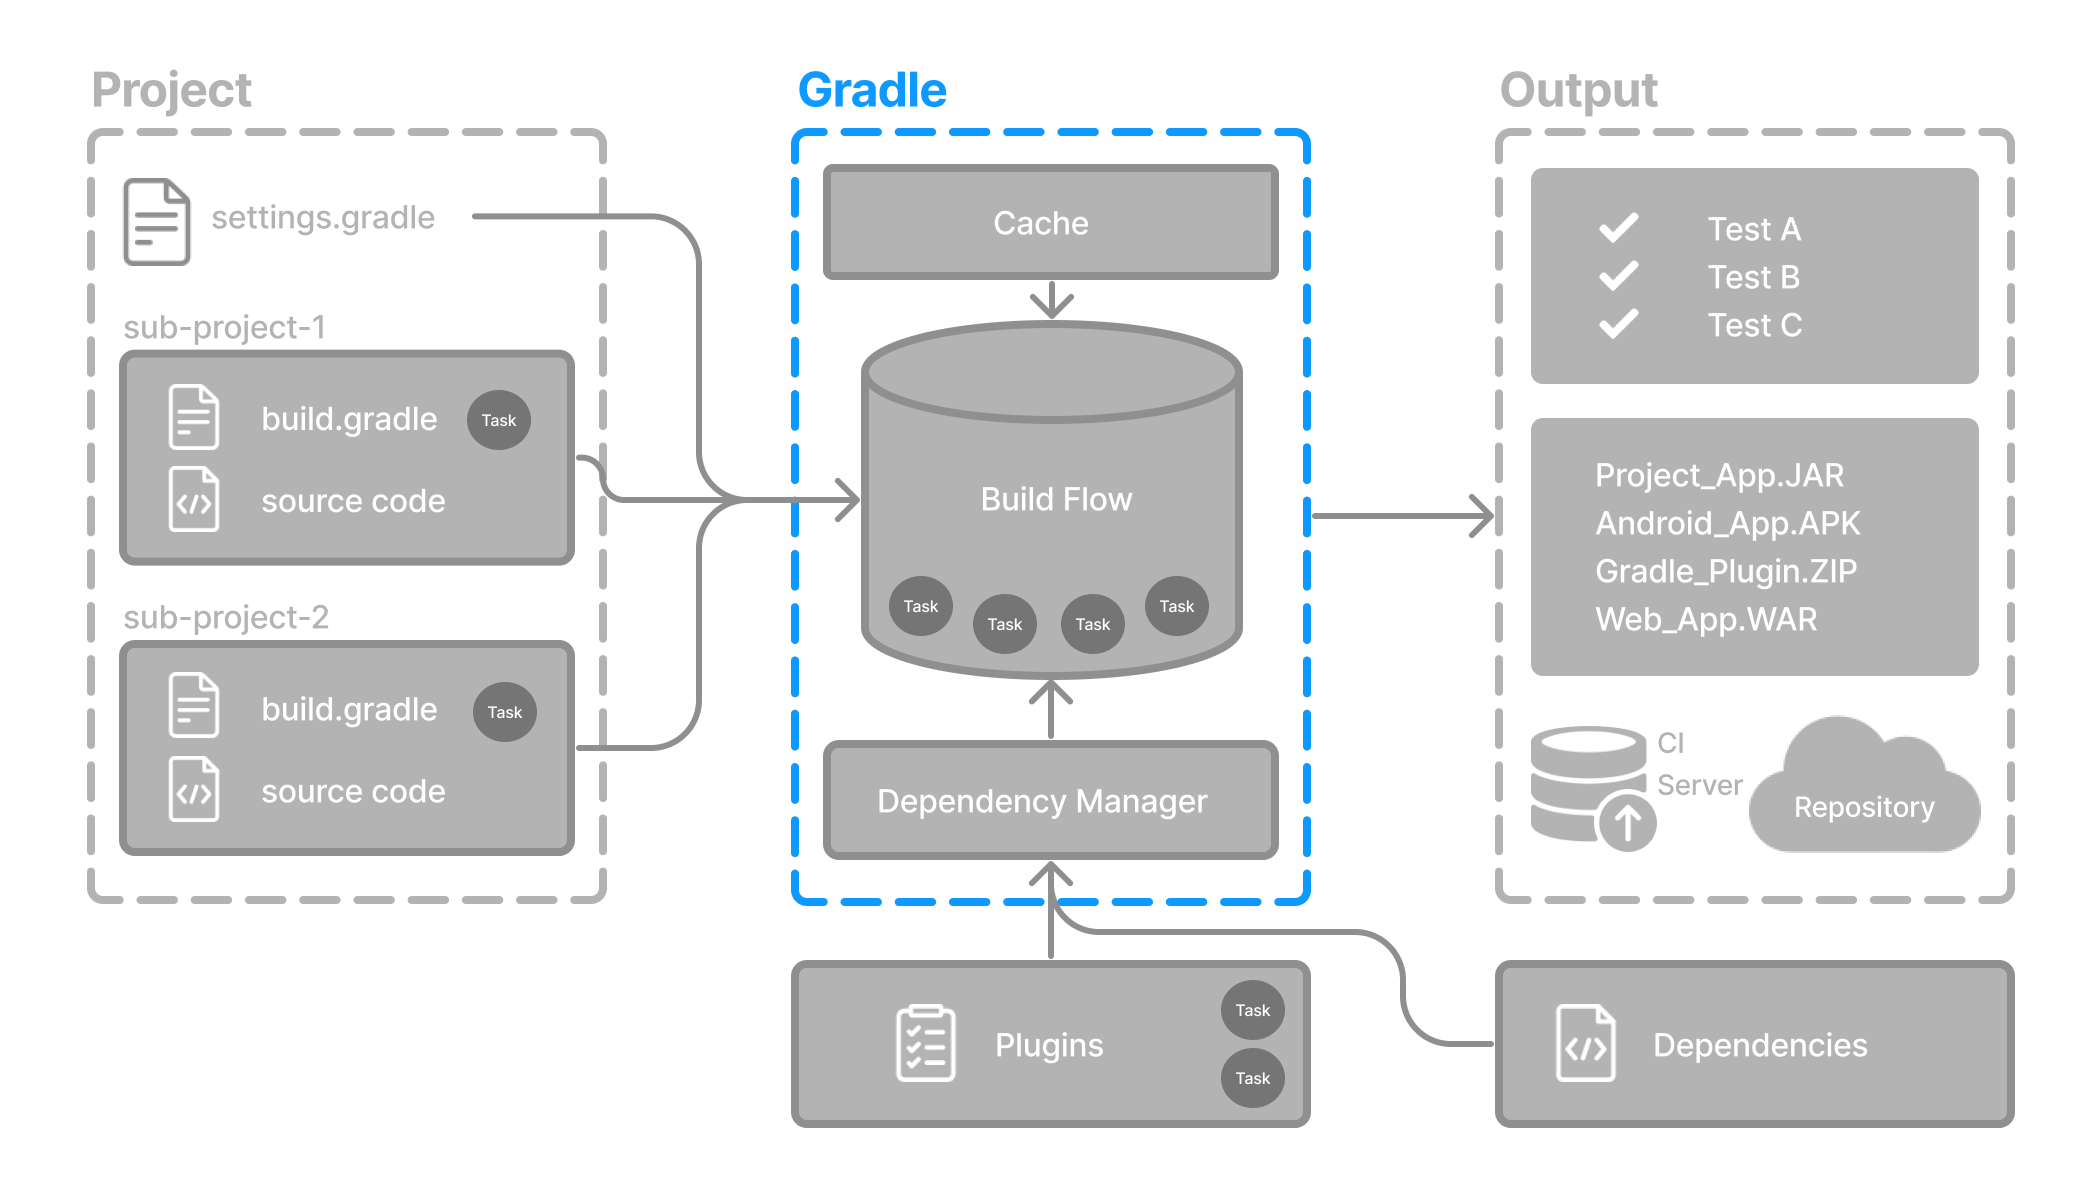
Gradle project structure
Many developers will interact with Gradle for the first time through an existing project.
The presence of the gradlew and gradlew.bat files in the root directory of a project is a clear indicator that Gradle is used.
A Gradle project will look similar to the following:
project
├── gradle
│   ├── libs.versions.toml
│   └── wrapper
│       ├── gradle-wrapper.jar
│       └── gradle-wrapper.properties
├── gradlew
├── gradlew.bat
├── settings.gradle(.kts)
├── subproject-a
│   ├── build.gradle(.kts)
│   └── src
└── subproject-b
    ├── build.gradle(.kts)
└── src | Gradle directory to store wrapper files and more | |
| Gradle version catalog for dependency management | |
| Gradle wrapper scripts | |
| Gradle settings file to define a root project name and subprojects | |
Gradle build scripts of the two subprojects - subproject-a and subproject-b | |
| Source code and/or additional files for the projects |
Invoking Gradle
IDE
Gradle is built-in to many IDEs including Android Studio, IntelliJ IDEA, Visual Studio Code, Eclipse, and NetBeans.
Gradle can be automatically invoked when you build, clean, or run your app in the IDE.
It is recommended that you consult the manual for the IDE of your choice to learn more about how Gradle can be used and configured.
Command line
Gradle can be invoked in the command line once installed. For example:
$ gradle build| Most projects do not use the installed version of Gradle. |
Gradle Wrapper
The Wrapper is a script that invokes a declared version of Gradle and is the recommended way to execute a Gradle build. It is found in the project root directory as a gradlew or gradlew.bat file:
$ gradlew build     // Linux or OSX
$ gradlew.bat build  // Windows
Gradle Wrapper Basics
The recommended way to execute any Gradle build is with the Gradle Wrapper.
The Wrapper script invokes a declared version of Gradle, downloading it beforehand if necessary.
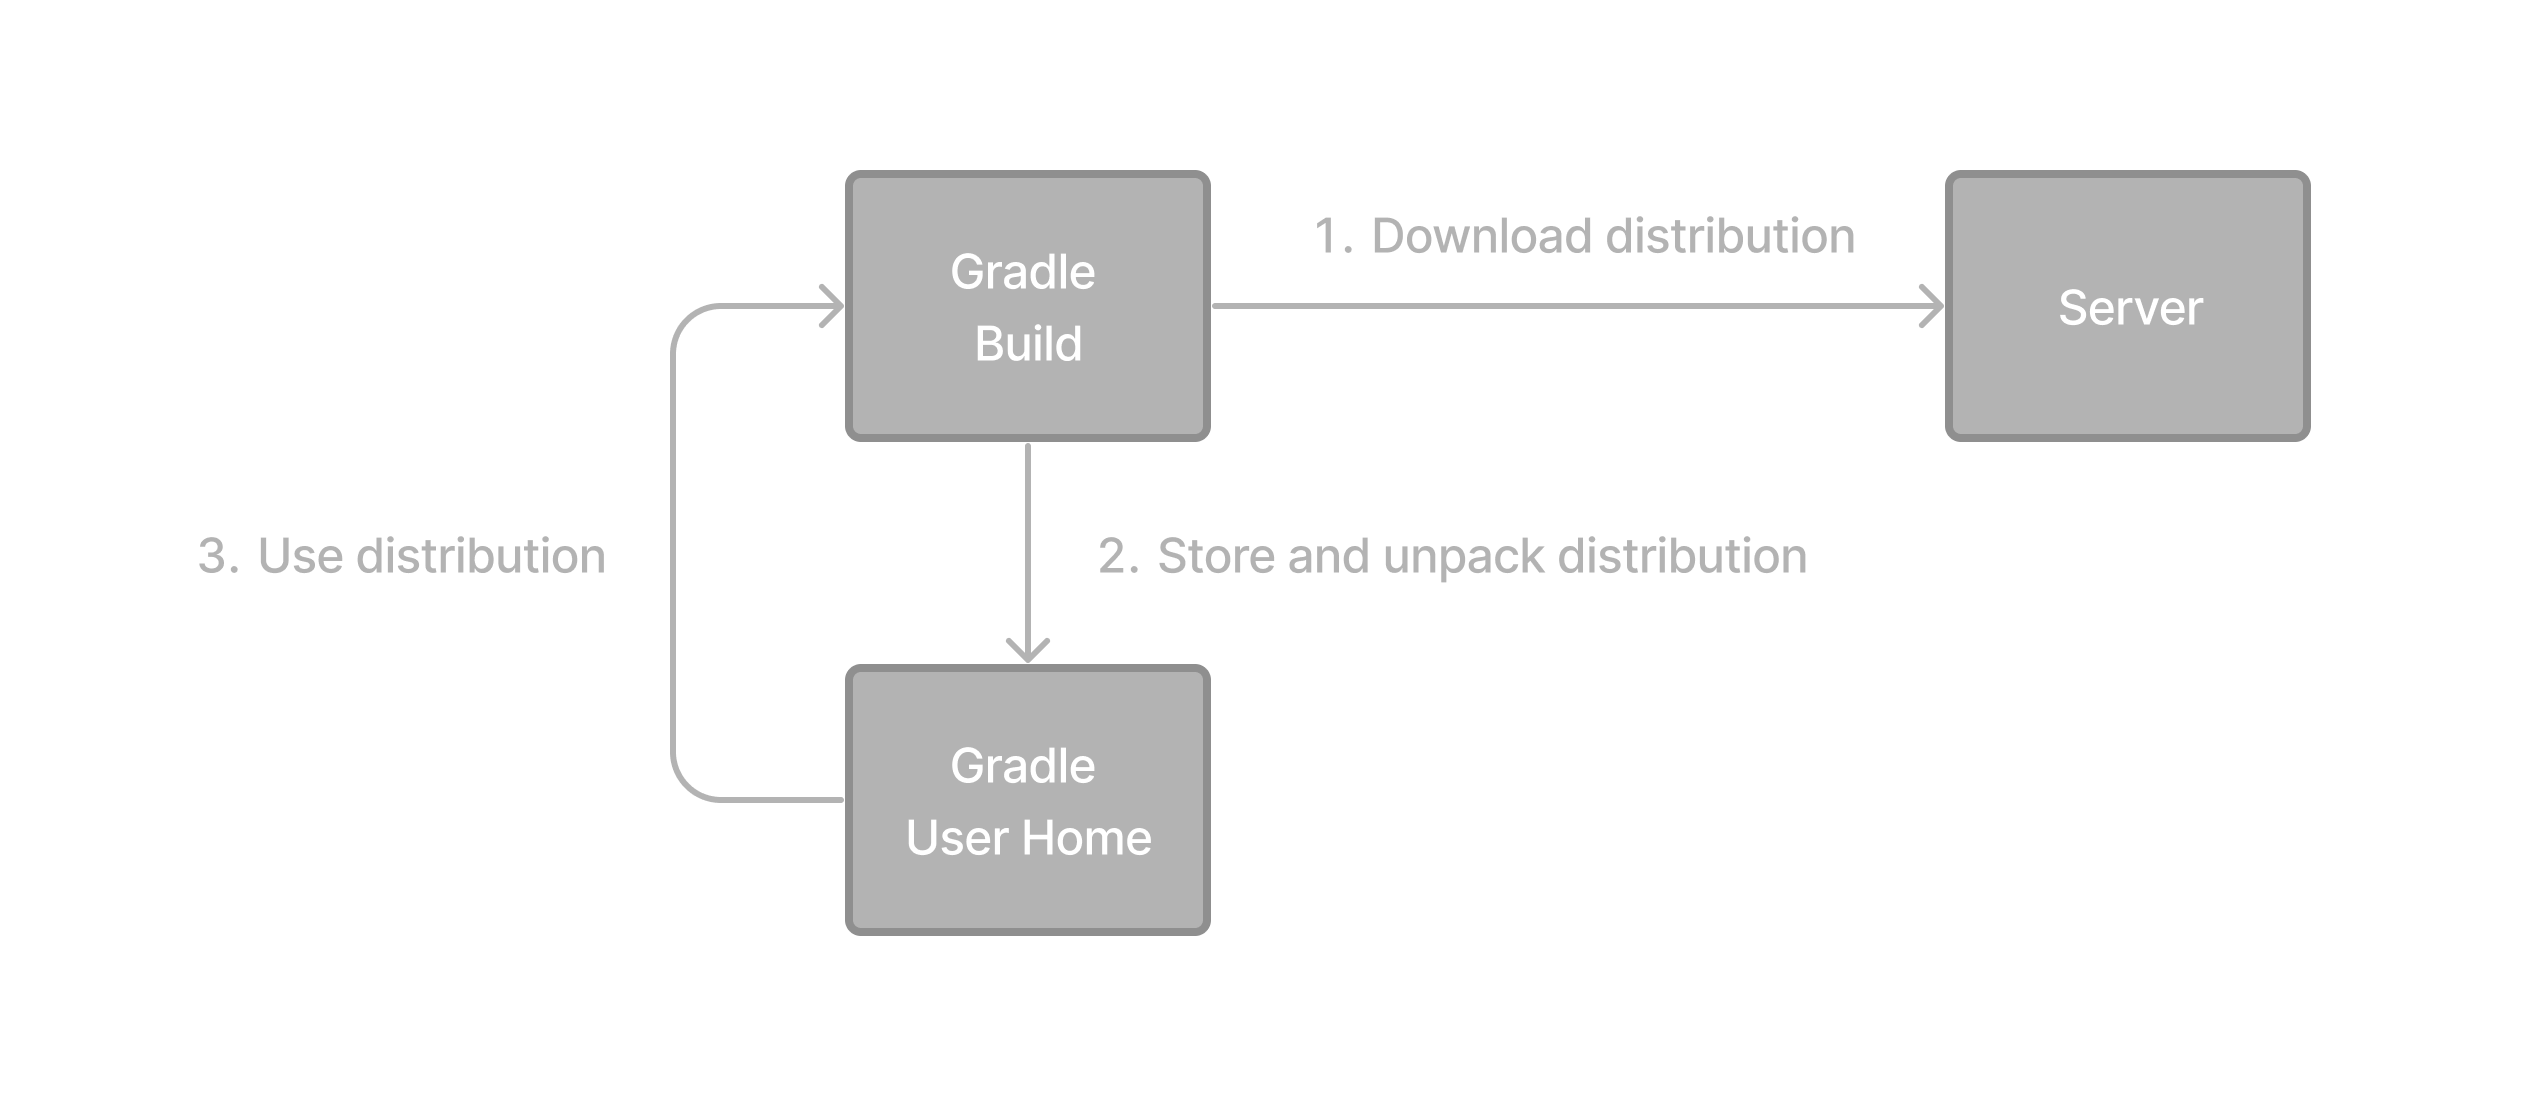
The Wrapper is available as a gradlew or gradlew.bat file.
The Wrapper provides the following benefits:
Standardizes a project on a given Gradle version.
Provisions the same Gradle version for different users.
Provisions the Gradle version for different execution environments (IDEs, CI servers…).
Using the Gradle Wrapper
It is always recommended to execute a build with the Wrapper to ensure a reliable, controlled, and standardized execution of the build.
Depending on the operating system, you run gradlew or gradlew.bat instead of the gradle command.
Typical Gradle invocation:
$ gradle build
To run the Wrapper on a Linux or OSX machine:
$ ./gradlew build
To run the Wrapper on Windows PowerShell:
$ .\gradlew.bat build
The command is run in the same directory that the Wrapper is located in. If you want to run the command in a different directory, you must provide the relative path to the Wrapper:
$ ../gradlew build
The following console output demonstrates the use of the Wrapper on a Windows machine, in the command prompt (cmd), for a Java-based project:
$ gradlew.bat build
Downloading https://services.gradle.org/distributions/gradle-5.0-all.zip
.....................................................................................
Unzipping C:\Documents and Settings\Claudia\.gradle\wrapper\dists\gradle-5.0-all\ac27o8rbd0ic8ih41or9l32mv\gradle-5.0-all.zip to C:\Documents and Settings\Claudia\.gradle\wrapper\dists\gradle-5.0-al\ac27o8rbd0ic8ih41or9l32mv
Set executable permissions for: C:\Documents and Settings\Claudia\.gradle\wrapper\dists\gradle-5.0-all\ac27o8rbd0ic8ih41or9l32mv\gradle-5.0\bin\gradle
BUILD SUCCESSFUL in 12s
1 actionable task: 1 executed
Understanding the Wrapper files
The following files are part of the Gradle Wrapper:
.
├── gradle
│ └── wrapper
│ ├── gradle-wrapper.jar
│ └── gradle-wrapper.properties
├── gradlew
└── gradlew.bat
gradle-wrapper.jar: This is a small JAR file that contains the Gradle Wrapper code. It is responsible for downloading and installing the correct version of Gradle for a project if it’s not already installed.gradle-wrapper.properties: This file contains configuration properties for the Gradle Wrapper, such as the distribution URL (where to download Gradle from) and the distribution type (ZIP or TARBALL).gradlew: This is a shell script (Unix-based systems) that acts as a wrapper around gradle-wrapper.jar. It is used to execute Gradle tasks on Unix-based systems without needing to manually install Gradle.gradlew.bat: This is a batch script (Windows) that serves the same purpose as gradlew but is used on Windows systems.
You should never alter these files.
If you want to view or update the Gradle version of your project, use the command line. Do not edit the wrapper files manually:
$ ./gradlew --version
$ ./gradlew wrapper --gradle-version 7.2
$ gradlew.bat --version
$ gradlew.bat wrapper --gradle-version 7.2
Command-Line Interface Basics
The command-line interface is the primary method of interacting with Gradle outside the IDE.
Use of the Gradle Wrapper is highly encouraged.
Substitute ./gradlew (in macOS / Linux) or gradlew.bat (in Windows) for gradle in the following examples.
Executing Gradle on the command line conforms to the following structure:
gradle [taskName...] [--option-name...]
Options are allowed before and after task names.
gradle [--option-name...] [taskName...]
If multiple tasks are specified, you should separate them with a space.
gradle [taskName1 taskName2...] [--option-name...]
Options that accept values can be specified with or without = between the option and argument. The use of = is recommended.
gradle [...] --console=plain
Options that enable behavior have long-form options with inverses specified with --no-. The following are opposites.
gradle [...] --build-cache
gradle [...] --no-build-cache
Many long-form options have short-option equivalents. The following are equivalent:
gradle --help
gradle -h
Command-line usage
The following sections describe the use of the Gradle command-line interface. Some plugins also add their own command line options.
Executing tasks
To execute a task called taskName on the root project, type:
$ gradle :taskName
This will run the single taskName and all of its dependencies.
Specify options for tasks
To pass an option to a task, prefix the option name with -- after the task name:
$ gradle taskName --exampleOption=exampleValue
Settings File Basics
The settings file is the entry point of every Gradle project.
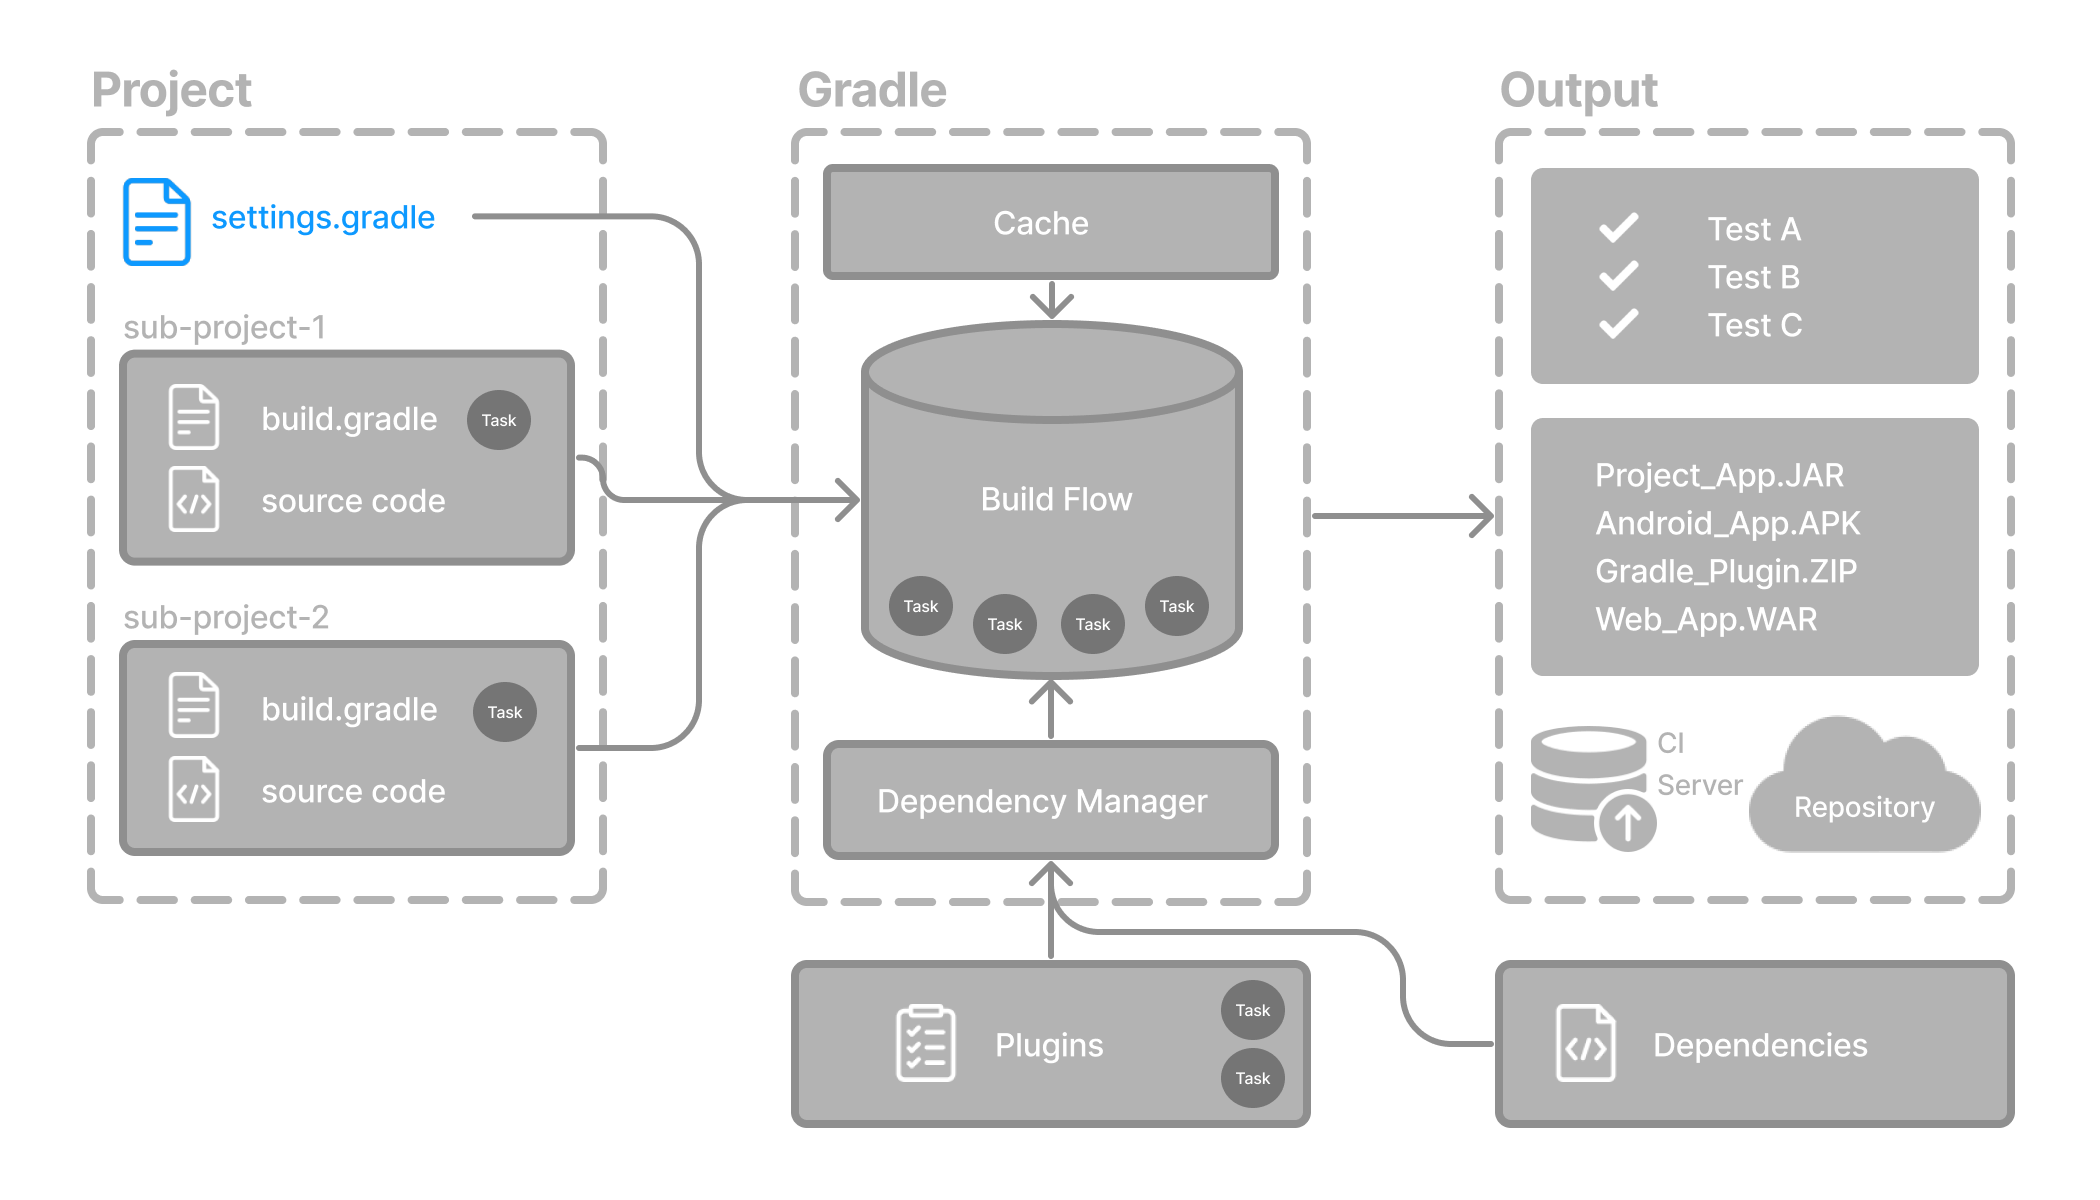
The primary purpose of the settings file is to add subprojects to your build.
Gradle supports single and multi-project builds.
For single-project builds, the settings file is optional.
For multi-project builds, the settings file is mandatory and declares all subprojects.
Settings script
The settings file is a script. It is either a settings.gradle file written in Groovy or a settings.gradle.kts file in Kotlin.
The Groovy DSL and the Kotlin DSL are the only accepted languages for Gradle scripts.
The settings file is typically found in the root directory of the project.
Let’s take a look at an example and break it down:
KotlinGroovysettings.gradlerootProject.name = 'root-project'
include('sub-project-a')
include('sub-project-b')
include('sub-project-c')
Define the project name. Add subprojects.
1. Define the project name
The settings file defines your project name:
rootProject.name = "root-project"
There is only one root project per build.
2. Add subprojects
The settings file defines the structure of the project by including subprojects, if there are any:
include("app")
include("business-logic")
include("data-model")
Build File Basics
Generally, a build script details build configuration, tasks, and plugins.
Every Gradle build comprises at least one build script.
In the build file, two types of dependencies can be added:
The libraries and/or plugins on which Gradle and the build script depend.
The libraries on which the project sources (i.e., source code) depend.
Build scripts
The build script is either a build.gradle file written in Groovy or a build.gradle.kts file in Kotlin.
The Groovy DSL and the Kotlin DSL are the only accepted languages for Gradle scripts.
Let’s take a look at an example and break it down:
KotlinGroovybuild.gradleplugins {
id 'application'
}
application {
mainClass = 'com.example.Main'
}
Add plugins. Use convention properties.
1. Add plugins
Plugins extend Gradle’s functionality and can contribute tasks to a project.
Adding a plugin to a build is called applying a plugin and makes additional functionality available.
plugins {
id("application")
}
The application plugin facilitates creating an executable JVM application.
Applying the Application plugin also implicitly applies the Java plugin. The java plugin adds Java compilation along with testing and bundling capabilities to a project.
2. Use convention properties
A plugin adds tasks to a project. It also adds properties and methods to a project.
The application plugin defines tasks that package and distribute an application, such as the run task.
The Application plugin provides a way to declare the main class of a Java application, which is required to execute the code.
application {
mainClass = "com.example.Main"
}
In this example, the main class (i.e., the point where the program’s execution begins) is com.example.Main.
Dependency Management Basics
Gradle has built-in support for dependency management.
Dependency management is an automated technique for declaring and resolving external resources required by a project.
Gradle build scripts define the process to build projects that may require external dependencies. Dependencies refer to JARs, plugins, libraries, or source code that support building your project.
Version Catalog
Version catalogs provide a way to centralize your dependency declarations in a libs.versions.toml file.
The catalog makes sharing dependencies and version configurations between subprojects simple. It also allows teams to enforce versions of libraries and plugins in large projects.
The version catalog typically contains four sections:
[versions] to declare the version numbers that plugins and libraries will reference.
[libraries] to define the libraries used in the build files.
[bundles] to define a set of dependencies.
[plugins] to define plugins.
[versions]
androidGradlePlugin = "7.4.1"
mockito = "2.16.0"
[libraries]
googleMaterial = { group = "com.google.android.material", name = "material", version = "1.1.0-alpha05" }
mockitoCore = { module = "org.mockito:mockito-core", version.ref = "mockito" }
[plugins]
androidApplication = { id = "com.android.application", version.ref = "androidGradlePlugin" }
The file is located in the gradle directory so that it can be used by Gradle and IDEs automatically. The version catalog should be checked into source control: gradle/libs.versions.toml.
Declaring Your Dependencies
To add a dependency to your project, specify a dependency in the dependencies block of your build.gradle(.kts) file.
The following build.gradle.kts file adds a plugin and two dependencies to the project using the version catalog above:
plugins {
alias(libs.plugins.androidApplication)
}
dependencies {
// Dependency on a remote binary to compile and run the code
implementation(libs.googleMaterial)
// Dependency on a remote binary to compile and run the test code
testImplementation(libs.mockitoCore)
}
Applies the Android Gradle plugin to this project, which adds several features that are specific to building Android apps. Adds the Material dependency to the project. Material Design provides components for creating a user interface in an Android App. This library will be used to compile and run the Kotlin source code in this project. Adds the Mockito dependency to the project. Mockito is a mocking framework for testing Java code. This library will be used to compile and run the test source code in this project.
Dependencies in Gradle are grouped by configurations.
The material library is added to the implementation configuration, which is used for compiling and running production code.
The mockito-core library is added to the testImplementation configuration, which is used for compiling and running test code.
There are many more configurations available.
Viewing Project Dependencies
You can view your dependency tree in the terminal using the ./gradlew :app:dependencies command:
$ ./gradlew :app:dependencies
> Task :app:dependencies
------------------------------------------------------------
Project ':app'
------------------------------------------------------------
implementation - Implementation only dependencies for source set 'main'. (n)
\--- com.google.android.material:material:1.1.0-alpha05 (n)
testImplementation - Implementation only dependencies for source set 'test'. (n)
\--- org.mockito:mockito-core:2.16.0 (n)
...
Task Basics
A task represents some independent unit of work that a build performs, such as compiling classes, creating a JAR, generating Javadoc, or publishing archives to a repository.
You run a Gradle build task using the gradle command or by invoking the Gradle Wrapper (./gradlew or gradlew.bat) in your project directory:
$ ./gradlew build
Available tasks
All available tasks in your project come from Gradle plugins and build scripts.
You can list all the available tasks in the project by running the following command in the terminal:
$ ./gradlew tasks
Application tasks
-----------------
run - Runs this project as a JVM application
Build tasks
-----------
assemble - Assembles the outputs of this project.
build - Assembles and tests this project.
...
Documentation tasks
-------------------
javadoc - Generates Javadoc API documentation for the main source code.
...
Other tasks
-----------
compileJava - Compiles main Java source.
...
Running tasks
The run task is executed with ./gradlew run:
$ ./gradlew run
> Task :app:compileJava
> Task :app:processResources NO-SOURCE
> Task :app:classes
> Task :app:run
Hello World!
BUILD SUCCESSFUL in 904ms
2 actionable tasks: 2 executed
In this example Java project, the output of the run task is a Hello World statement printed on the console.
Task dependency
Many times, a task requires another task to run first.
For example, for Gradle to execute the build task, the Java code must first be compiled. Thus, the build task depends on the compileJava task.
This means that the compileJava task will run before the build task:
$ ./gradlew build
> Task :app:compileJava
> Task :app:processResources NO-SOURCE
> Task :app:classes
> Task :app:jar
> Task :app:startScripts
> Task :app:distTar
> Task :app:distZip
> Task :app:assemble
> Task :app:compileTestJava
> Task :app:processTestResources NO-SOURCE
> Task :app:testClasses
> Task :app:test
> Task :app:check
> Task :app:build
BUILD SUCCESSFUL in 764ms
7 actionable tasks: 7 executed
Build scripts can optionally define task dependencies. Gradle then automatically determines the task execution order.
Plugin Basics
Gradle is built on a plugin system. Gradle itself is primarily composed of infrastructure, such as a sophisticated dependency resolution engine. The rest of its functionality comes from plugins.
A plugin is a piece of software that provides additional functionality to the Gradle build system.
Plugins can be applied to a Gradle build script to add new tasks, configurations, or other build-related capabilities:
- The Java Library Plugin -
java-library Used to define and build Java libraries. It compiles Java source code with the compileJava task, generates Javadoc with the javadoc task, and packages the compiled classes into a JAR file with the jar task.
- The Google Services Gradle Plugin -
com.google.gms:google-services Enables Google APIs and Firebase services in your Android application with a configuration block called googleServices{} and a task called generateReleaseAssets.
- The Gradle Bintray Plugin -
com.jfrog.bintray Allows you to publish artifacts to Bintray by configuring the plugin using the bintray{} block.
Plugin distribution
Plugins are distributed in three ways:
Core plugins - Gradle develops and maintains a set of Core Plugins.
Community plugins - Gradle’s community shares plugins via the Gradle Plugin Portal.
Local plugins - Gradle enables users to create custom plugins using APIs.
Applying plugins
Applying a plugin to a project allows the plugin to extend the project’s capabilities.
You apply plugins in the build script using a plugin id (a globally unique identifier / name) and a version:
plugins {
id «plugin id» version «plugin version»
}
1. Core plugins
Gradle Core plugins are a set of plugins that are included in the Gradle distribution itself. These plugins provide essential functionality for building and managing projects.
Some examples of core plugins include:
java: Provides support for building Java projects.
groovy: Adds support for compiling and testing Groovy source files.
ear: Adds support for building EAR files for enterprise applications.
Core plugins are unique in that they provide short names, such as java for the core JavaPlugin, when applied in build scripts. They also do not require versions. To apply the java plugin to a project:
build.gradle.ktsplugins {
id("java")
}
There are many Gradle Core Plugins users can take advantage of.
2. Community plugins
Community plugins are plugins developed by the Gradle community, rather than being part of the core Gradle distribution. These plugins provide additional functionality that may be specific to certain use cases or technologies.
The Spring Boot Gradle plugin packages executable JAR or WAR archives, and runs Spring Boot Java applications.
To apply the org.springframework.boot plugin to a project:
build.gradle.ktsplugins {
id("org.springframework.boot") version "3.1.5"
}
Community plugins can be published at the Gradle Plugin Portal, where other Gradle users can easily discover and use them.
3. Local plugins
Custom or local plugins are developed and used within a specific project or organization. These plugins are not shared publicly and are tailored to the specific needs of the project or organization.
Local plugins can encapsulate common build logic, provide integrations with internal systems or tools, or abstract complex functionality into reusable components.
Gradle provides users with the ability to develop custom plugins using APIs. To create your own plugin, you’ll typically follow these steps:
Define the plugin class: create a new class that implements the Plugin<Project> interface.
// Define a 'HelloPlugin' plugin
class HelloPlugin : Plugin<Project> {
override fun apply(project: Project) {
// Define the 'hello' task
val helloTask = project.tasks.register("hello") {
doLast {
println("Hello, Gradle!")
}
}
}
}
Build and optionally publish your plugin: generate a JAR file containing your plugin code and optionally publish this JAR to a repository (local or remote) to be used in other projects.
// Publish the plugin
plugins {
`maven-publish`
}
publishing {
publications {
create<MavenPublication>("mavenJava") {
from(components["java"])
}
}
repositories {
mavenLocal()
}
}
Apply your plugin: when you want to use the plugin, include the plugin ID and version in the plugins{} block of the build file.
// Apply the plugin
plugins {
id("com.example.hello") version "1.0"
}
Gradle Incremental Builds and Build Caching
Gradle uses two main features to reduce build time: incremental builds and build caching.
Incremental builds
An incremental build is a build that avoids running tasks whose inputs have not changed since the previous build. Re-executing such tasks is unnecessary if they would only re-produce the same output.
For incremental builds to work, tasks must define their inputs and outputs. Gradle will determine whether the input or outputs have changed at build time. If they have changed, Gradle will execute the task. Otherwise, it will skip execution.
Incremental builds are always enabled, and the best way to see them in action is to turn on verbose mode. With verbose mode, each task state is labeled during a build:
$ ./gradlew compileJava --console=verbose
> Task :buildSrc:generateExternalPluginSpecBuilders UP-TO-DATE
> Task :buildSrc:extractPrecompiledScriptPluginPlugins UP-TO-DATE
> Task :buildSrc:compilePluginsBlocks UP-TO-DATE
> Task :buildSrc:generatePrecompiledScriptPluginAccessors UP-TO-DATE
> Task :buildSrc:generateScriptPluginAdapters UP-TO-DATE
> Task :buildSrc:compileKotlin UP-TO-DATE
> Task :buildSrc:compileJava NO-SOURCE
> Task :buildSrc:compileGroovy NO-SOURCE
> Task :buildSrc:pluginDescriptors UP-TO-DATE
> Task :buildSrc:processResources UP-TO-DATE
> Task :buildSrc:classes UP-TO-DATE
> Task :buildSrc:jar UP-TO-DATE
> Task :list:compileJava UP-TO-DATE
> Task :utilities:compileJava UP-TO-DATE
> Task :app:compileJava UP-TO-DATE
BUILD SUCCESSFUL in 374ms
12 actionable tasks: 12 up-to-date
When you run a task that has been previously executed and hasn’t changed, then UP-TO-DATE is printed next to the task.
To permanently enable verbose mode, add org.gradle.console=verbose to your gradle.properties file.
Build caching
Incremental Builds are a great optimization that helps avoid work already done. If a developer continuously changes a single file, there is likely no need to rebuild all the other files in the project.
However, what happens when the same developer switches to a new branch created last week? The files are rebuilt, even though the developer is building something that has been built before.
This is where a build cache is helpful.
The build cache stores previous build results and restores them when needed. It prevents the redundant work and cost of executing time-consuming and expensive processes.
When the build cache has been used to repopulate the local directory, the tasks are marked as FROM-CACHE:
$ ./gradlew compileJava --build-cache
> Task :buildSrc:generateExternalPluginSpecBuilders UP-TO-DATE
> Task :buildSrc:extractPrecompiledScriptPluginPlugins UP-TO-DATE
> Task :buildSrc:compilePluginsBlocks UP-TO-DATE
> Task :buildSrc:generatePrecompiledScriptPluginAccessors UP-TO-DATE
> Task :buildSrc:generateScriptPluginAdapters UP-TO-DATE
> Task :buildSrc:compileKotlin UP-TO-DATE
> Task :buildSrc:compileJava NO-SOURCE
> Task :buildSrc:compileGroovy NO-SOURCE
> Task :buildSrc:pluginDescriptors UP-TO-DATE
> Task :buildSrc:processResources UP-TO-DATE
> Task :buildSrc:classes UP-TO-DATE
> Task :buildSrc:jar UP-TO-DATE
> Task :list:compileJava FROM-CACHE
> Task :utilities:compileJava FROM-CACHE
> Task :app:compileJava FROM-CACHE
BUILD SUCCESSFUL in 364ms
12 actionable tasks: 3 from cache, 9 up-to-date
Once the local directory has been repopulated, the next execution will mark tasks as UP-TO-DATE and not FROM-CACHE.
The build cache allows you to share and reuse unchanged build and test outputs across teams. This speeds up local and CI builds since cycles are not wasted re-building binaries unaffected by new code changes.
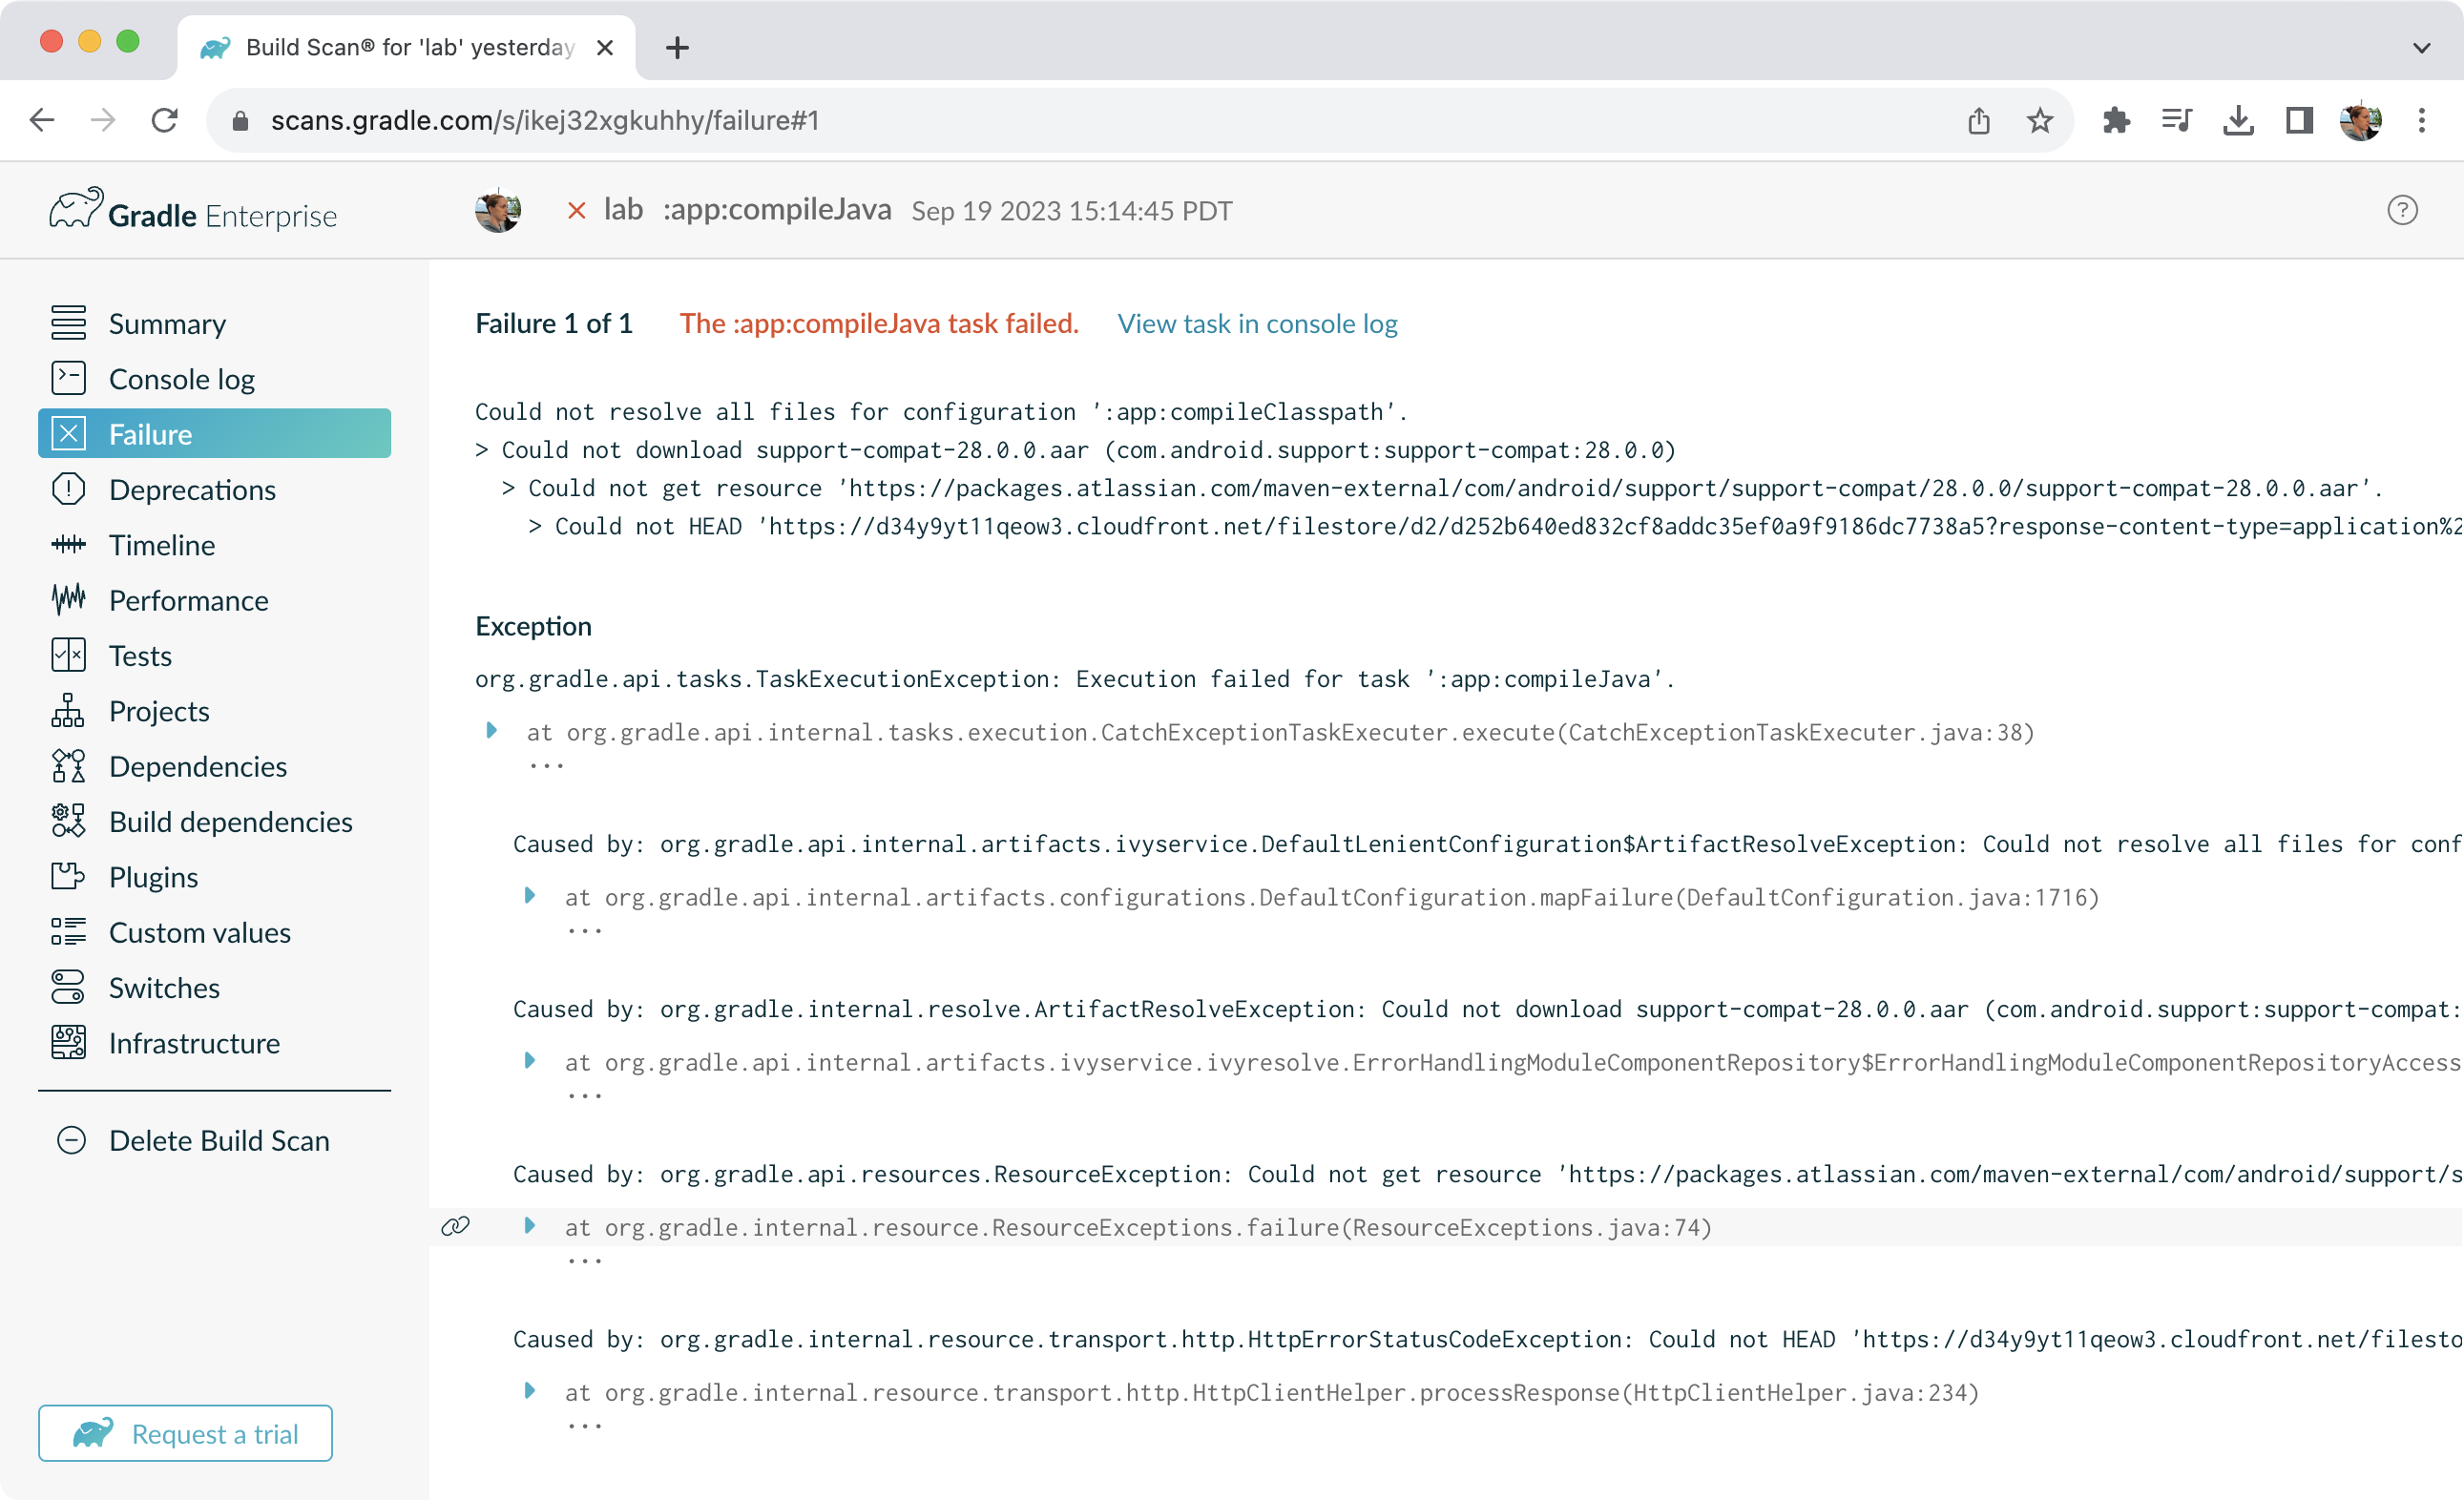
Build Scans
A build scan is a representation of metadata captured as you run your build.
Build Scans
Gradle captures your build metadata and sends it to the Build Scan Service. The service then transforms the metadata into information you can analyze and share with others.
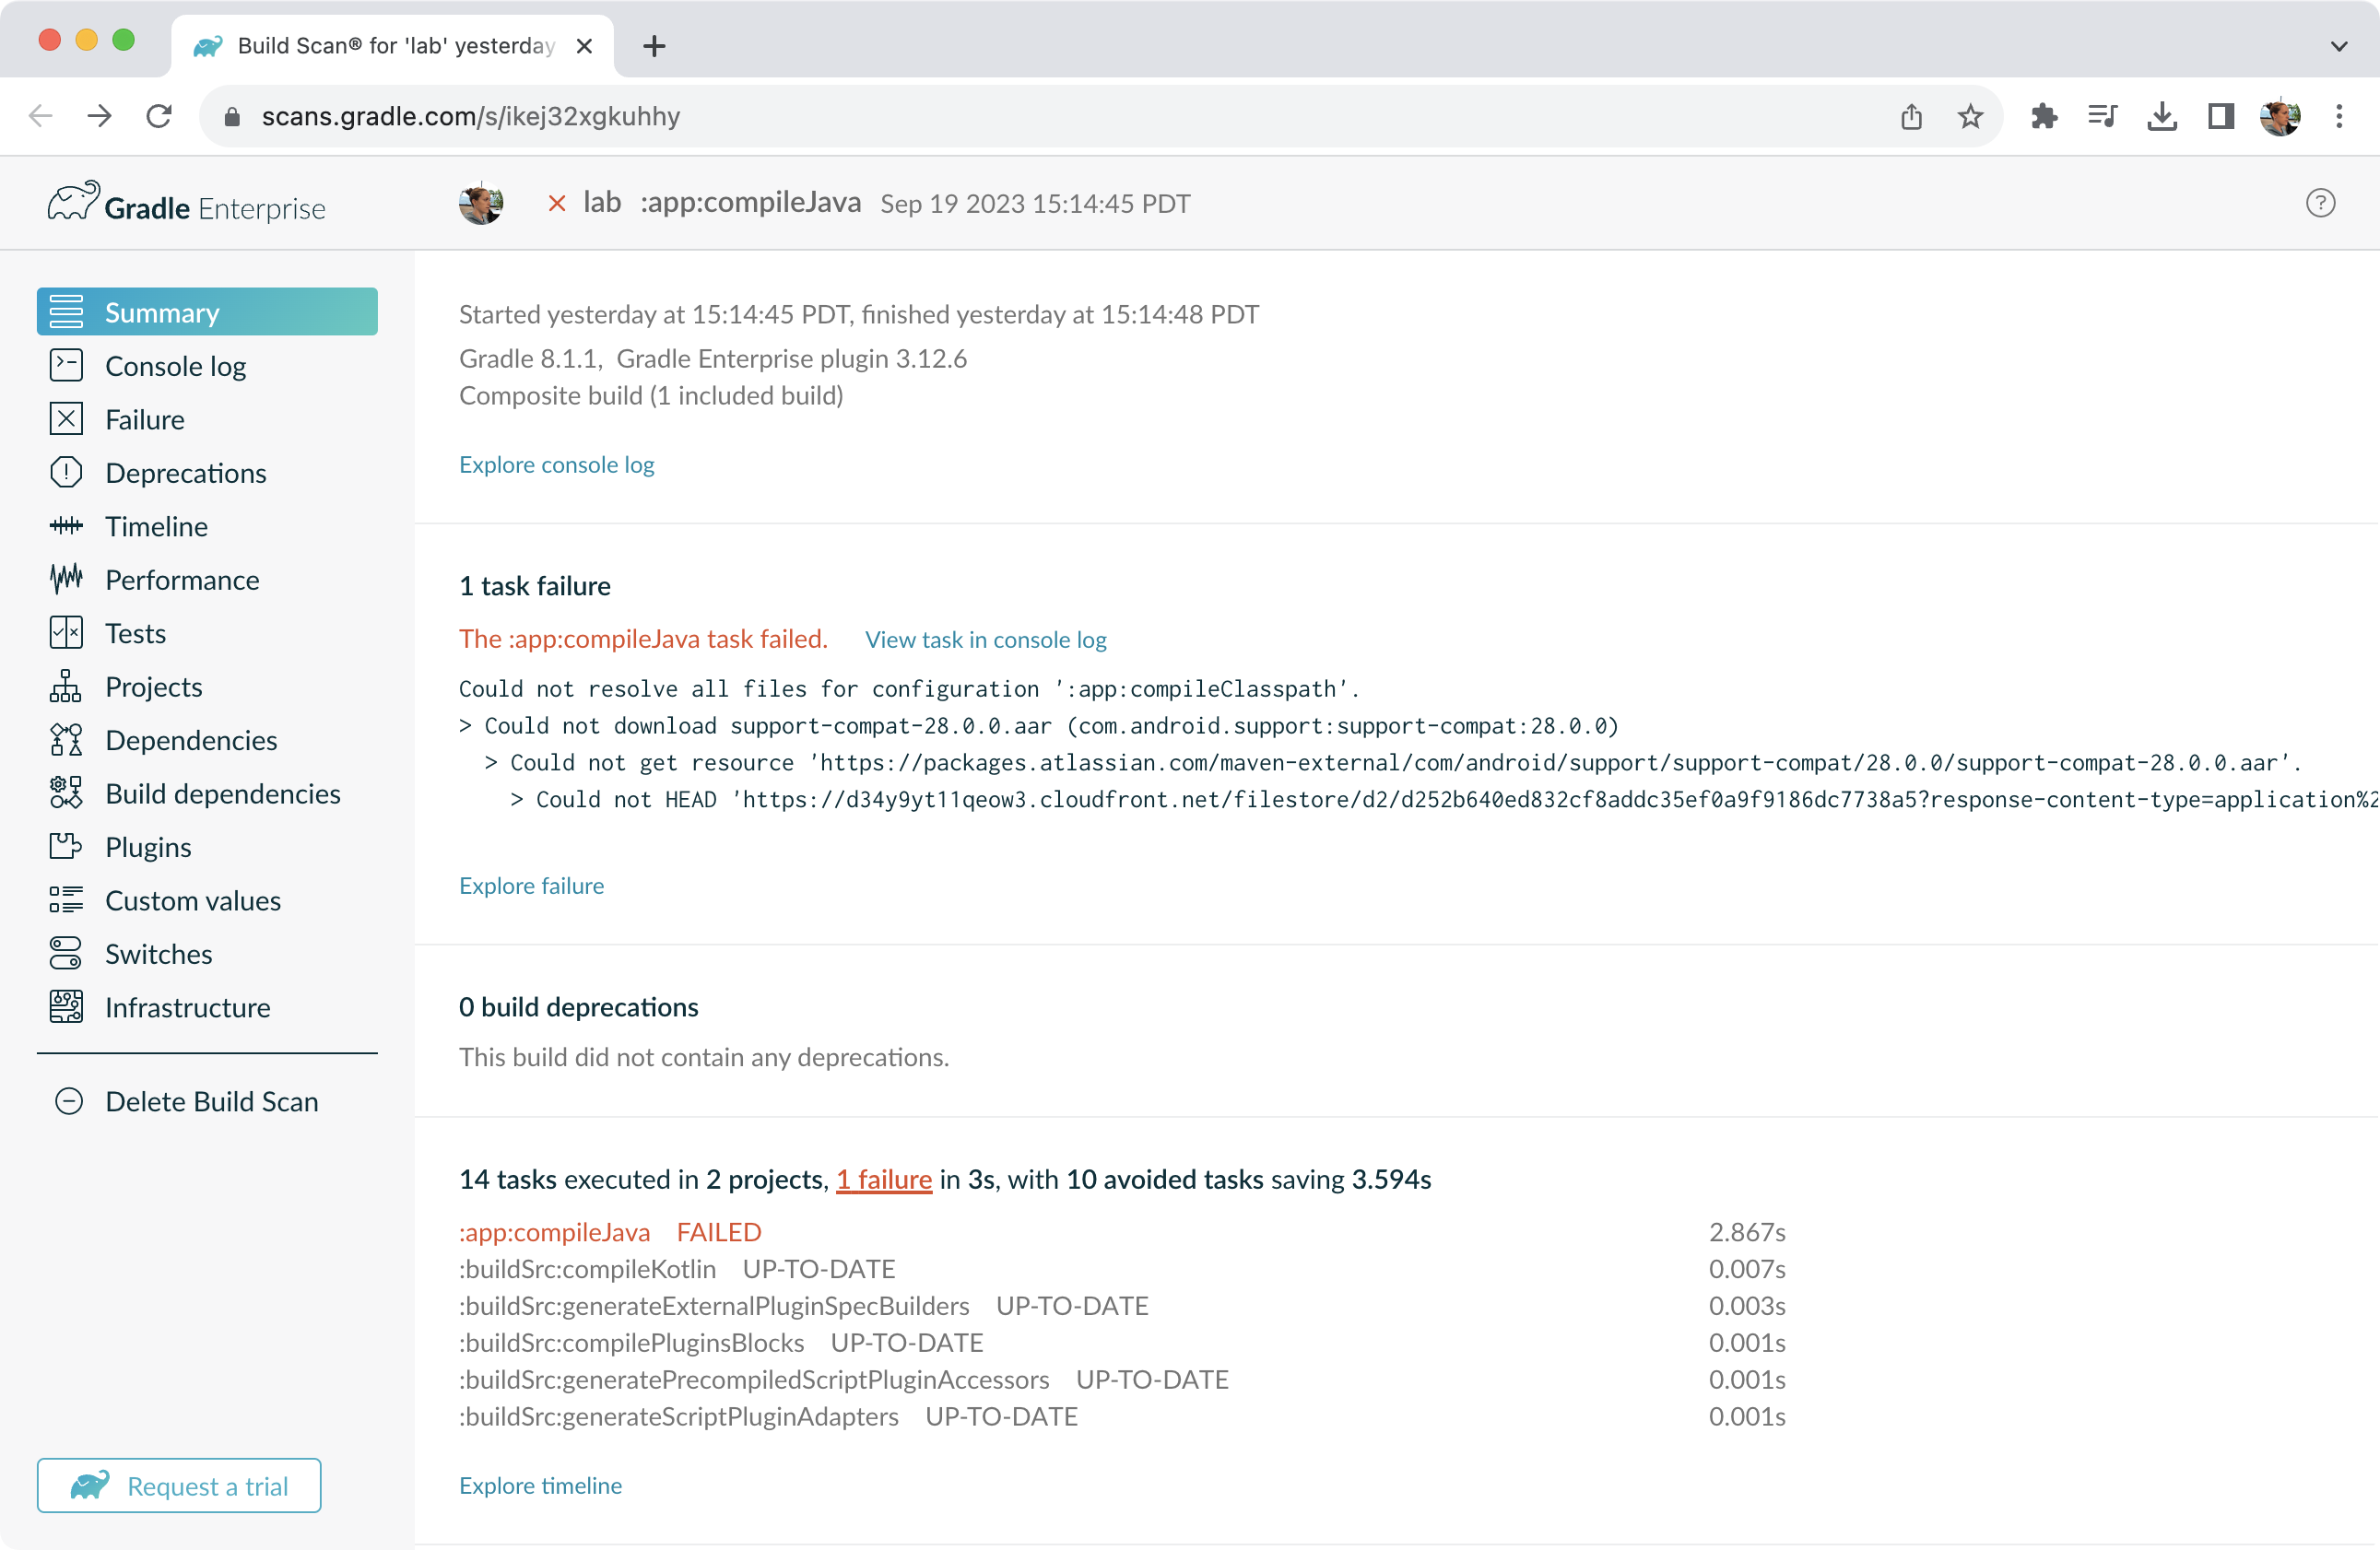
The information that scans collect can be an invaluable resource when troubleshooting, collaborating on, or optimizing the performance of your builds.
For example, with a build scan, it’s no longer necessary to copy and paste error messages or include all the details about your environment each time you want to ask a question on Stack Overflow, Slack, or the Gradle Forum. Instead, copy the link to your latest build scan.
Enable Build Scans
To enable build scans on a gradle command, add --scan to the command line option:
./gradlew build --scan
You may be prompted to agree to the terms to use Build Scans.
Comments
Post a Comment